Blue screen blues: how to fix kernel security check failure
Kernel Security Check Failure Error, Fixed
While Windows 10 has certainly improved over the years, it still has many quirky bugs and errors, just like the kernel security check failure. Hopefully, you were able to resolve the problem with one of the methods listed above.
Delete These Windows Files and Folders to Free Up Disk Space
Need to clear disk space on your Windows computer? Here are the Windows files and folders that can be safely deleted to free up disk space.
Read Next
About The Author
Shaant Minhas
(59 Articles Published)
Shaant is a Staff Writer at MUO. A graduate in Computer Applications, he uses his passion for writing to explain complex tech in plain English. When not researching or writing, he can be found enjoying a good book, running, or hanging out with friends.
More
From Shaant Minhas
Cause
Using the parameter 1 table, and a dump file, it is possible to narrow down the cause for many bug checks of this type.
LIST_ENTRY corruption can be difficult to track down and this bug check, indicates that an inconsistency has been introduced into a doubly-linked list (detected when an individual list entry element is added to or removed from the list). Unfortunately, the inconsistency is not necessarily detected at the time when the corruption occurred, so some detective work may be necessary to identify the root cause.
Common causes of list entry corruption include:
- A driver has corrupted a kernel synchronization object, such as a KEVENT (for example double initializing a KEVENT while a thread was still waiting on that same KEVENT, or allowing a stack-based KEVENT to go out of scope while another thread was using that KEVENT). This type of bug check typically occurs in nt!Ke* or nt!Ki* code. It can happen when a thread finishes waiting on a synchronization object or when code attempts to put a synchronization object in the signaled state. Usually, the synchronization object being signaled is the one that has been corrupted. Sometimes, Driver Verifier with special pool can help track down the culprit (if the corrupted synchronization object is in a pool block that has already been freed).
- A driver has corrupted a periodic KTIMER. This type of bug check typically occurs in nt!Ke* or nt!Ki* code and involves signaling a timer, or inserting or removing a timer from a timer table. The timer being manipulated may be the corrupted one, but it might be necessary to inspect the timer table with !timer (or manually walking the timer list links) to identify which timer has been corrupted. Sometimes, Driver Verifier with special pool can help track down the culprit (if the corrupted KTIMER is in a pool block that has already been freed).
- A driver has mismanaged an internal LIST_ENTRY-style linked list. A typical example would be calling RemoveEntryList twice on the same list entry without reinserting the list entry between the two RemoveEntryList calls. Other variations are possible, such as double inserting an entry into the same list.
- A driver has freed a data structure that contains a LIST_ENTRY without removing the data structure from its corresponding list, causing corruption to be detected later when the list is examined after the old pool block has been reused.
- A driver has used a LIST_ENTRY-style list in a concurrent fashion without proper synchronization, resulting in a torn update to the list.
In most cases, you can identify the corrupted data structure by walking the linked list both forward and backwards (the dl and dlb commands are useful for this purpose) and comparing the results. Where the list is inconsistent between a forward and backward walk is typically the location of the corruption. Since a linked list update operation can modify the list links of a neighboring element, you should look at the neighbors of a corrupted list entry closely, as they may be the underlying culprit.
Because many system components internally utilize LIST_ENTRY lists, various types of resource mismanagement by a driver using system APIs might cause linked list corruption in a system-managed linked list.
Ошибка kernel security check failure Windows 8 и 10
Ошибка kernel security check failure Windows 10 – очень заковыристая неприятность по нескольким причинам. Прежде всего, эту проблему могут спровоцировать, как программное обеспечение, так как конфликтная ситуация с каким-либо оборудованием. Во-вторых, синий экран kernel security check failure, падлюка хитрый – он может напоминать о своем существовании по несколько раз в день, а потом усыпить бдительность пользователя, делая перерыв на пару суток.
Тем не менее, ошибка kernel security check failure Windows есть, даже если она временно не показывает себя, а значит, эта неприятность, тихо и незаметно продолжает свою разрушительную деятельность.
Тем не менее, мы тоже не пальцем деланные, поэтому с радостью сообщаем вам о том, что может обозначать код ошибки kernel security check failure:
- Поздравляем – версия BIOS вашего компьютера окончательно устарела
- Что-то из установленного в ПК очень не желает работать в общей системе оборудования, короче буянит и провоцирует на конфликт.
- Драйвера потеряли свою актуальность.
- Системный реестр испытывает серьезные проблемы со своей исправностью.
Фу.. с самым сложным разобрались. Остался последний и очень простой этап – понять, как исправить kernel security check failure Windows 10.
Рецептура лечения
Что делать — kernel security check failure Windows 8? Что делать, что делать..исправлять!

И начнем мы процедуру лечения ошибки kernel security check failure Windows 10 с БИОСа. Сделать это достаточно просто:
- Узнать очень важную информацию о том – кто же произвел материнскую плату, которая используется на вашем ПК? Сделать это можно с помощью документации компьютера или воспользовавшись специальной программкой «Speccy», которую можно скачать из интернета на шару.
- Дальше – скачивание и установка оригинального ПО, которое выполнит обновление BIOS в автоматическом режиме. Например, для материнки от ASUS это будет «AsusUpdate», а для MSI – «MSILiveUpdate», ну и так далее в том же духе.
Не помогло? Ну и фиг с ним – у нас в загашнике есть еще способы борьбы с этой неприятностью, известной как синий экран kernel security check failure! Было бы вполне логично перейти к проверке актуальных версий драйверов. Так и поступим. В этой ситуации рекомендуется делать все своими ручками, а не надеется на программы, которые иногда дают сбой. Поэтому подкладываем подушечку под пятую точку и приступаем:
- Через «Пуск» переходим в «диспетчер задач» (Компьютер – система -..).
- Поочередно нажимаем на каждом устройстве правой кнопкой мышки, переходим в настройки и пытаемся обновить драйвера. Понимаю, долго. Понимаю, нудно. Но надо!
Кстати при установке Windows 10 – «kernel security check failure» — вполне распространенное явление. Все дело в том, что последняя операционка от Microsoft достаточно требовательна к ресурсам ПК, поэтому некоторые модели могут просто не потянуть ее. Может не хватить памяти, например. Что делать? Да забить на такую инсталляцию, так как семерка и восьмерка еще не потеряли своей актуальности. Но если очень надо – вперед в магазин для апгрейда своего PC!
Перейдем к исправлению реестра системы, так как он вполне может быть такой себе первопричиной этой неприятной ситуации. Что делаем:
- Открываем командную строку и вбиваем «regedit».
- Терпеливо ждем результата.
- Делаем контрольный выстрел с помощью одной из полезных программ, например, CCleaner или Ashampoo Optimizer.
Последний вариант возникновения ошибки kernel security check failure Windows – что-то пошло не так при установке нового оборудования. Если это внешнее устройство (например, принтер, камера и так далее), то его проще отключить и выполнить диагностику работоспособности компьютера. Собственно эту неприятность может вызвать абсолютно любая установка:
- Блок питания не справляется с характеристиками новой графической платы.
- Процессор не предназначен для используемой материнки.
- Планка памяти не соответствует необходимым параметрам.
То есть, прежде всего, необходимо изучить всю техническую документацию, прежде чем начинать выполнять самостоятельный апгрейд. А лучше доверять такую работу специалистам. Собственно, это все, что известно на сегодня про код ошибки kernel security check failure.
2. Start Your PC in Safe Mode
When you boot your Windows 10 in safe mode, your Windows 10 is only booted with a minimal set of files and drivers. Microsoft has introduced this feature to help users identify problems on their PC.
By booting up your PC in safe mode, you can figure out what is causing your PC’s kernel security check failure.
Follow the steps below to start Windows 10 in safe mode:
- Press the Windows Key + I to open the Settings, then select Update & Security > Recovery.
- Under Advanced Startup, click on Restart now.
- After the restart, on the Choose an option screen, click on Troubleshoot > Advanced options > Startup Settings > Restart.
- During the restart, press 4 or F4 to start your PC in safe mode.
After your PC has booted up in safe mode, you can see if you are still facing the same error as before. If not, you now know the problem is due to an additional app or driver enabled in the normal startup.
From here, you can attempt to work backward through your most recently installed apps. Uninstall your most recently installed apps and programs one by one, hopefully eradicating the error in the process.
Ошибка Kernel Security Check Failure: как исправить и почему возникает при работе Windows 10
Каждому пользователю Windows хоть раз приходилось сталкиваться с так называемым «синим экраном смерти», он же BSOD. Его причина возникновения может быть разная, начиная с перегрева и выхода из строя компонентов, и заканчивая битыми файлами операционной системы. В Windows 10 «синий экран смерти» стал более информативным, чем на прошлых версиях операционной системы. При его появлении на экране пользователь может ознакомиться с названием ошибки и ее кодом, после чего компьютер перезагрузится и запустится вновь, если удастся избавиться от проблемы в конкретный момент времени. Некоторые ошибки Windows сама устранить не может, и среди них Kernel Security Check Failure. В рамках данной статьи мы рассмотрим, почему она появляется, и как ее исправить.
Ошибка Kernel Security Check Failure
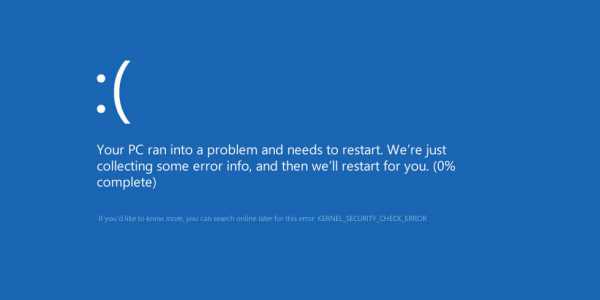
Распространенная ошибка Kernel Security Check Failure также может отображаться кодом 0×00000139. В большинстве случаев операционная система без вмешательства со стороны пользователя не может устранить причину ее появления. Наиболее часто она возникает из-за следующих проблем в работе компьютера:
- Неактуальная версия драйверов;
- «Битые» файлы реестра;
- Версия BIOS конфликтует с программным обеспечением;
- Неполадки в работе компонентов компьютера.
Выше перечислены наиболее распространенные причины, почему появляется ошибка Kernel Security Check Failure, но на деле их гораздо больше.
Как исправить ошибку Kernel Security Check Failure
Однозначно сказать, почему появляется ошибка 0×00000139 при работе компьютера невозможно. Иногда она может не беспокоить пользователя несколько недель подряд, а в некоторых случаях синий экран с ошибкой Kernel Security Check Failure возникает каждые 10-30 минут, перезагружая компьютер.
Приведем алгоритм действий, который позволит протестировать систему, определить и устранить причину ошибки Kernel Security Check Failure.
1. Проверка жесткого диска
Чтобы протестировать жесткий диск, необходимо вызвать командную строку от имени администратора и прописать в ней команду:

Обратите внимание: Если у вас установлено несколько жестких дисков, последовательно потребуется проводить проверку для каждого из них. Команда выше проверяет только раздел, именуемый буквой C, он же чаще всего системный
При следующем старте компьютера начнется автоматическая проверка жесткого диска, которая может продлиться достаточно долго, в зависимости от объема накопителя и количества файлов на нем.
2. Проверка системных файлов
После сканирования жесткого диска на ошибки, нужно выполнить проверку системных файлов. Для этого снова потребуется запустить командную строку от имени администратора и прописать в ней следующую команду:
sfc /scannow
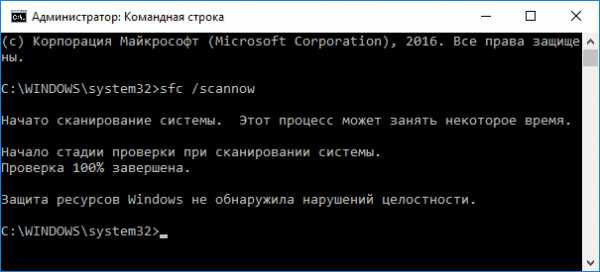
Данная команда позволяет проанализировать целостность системных файлов операционной системы Windows. Если в результате проверки будут найдены поврежденные файлы, утилита постарается их восстановить.
3. Тестирование оперативной памяти
Часто ошибка Kernel Security Check Failure возникает из-за проблем с оперативной памятью. Если в компьютере установлено несколько плашек ОЗУ, можно поочередно оставлять компьютер работать на одной из них и смотреть за реакцией, будет ли возникать в таком случае ошибка 0×00000139. Однако более эффективно провести полную проверку оперативной памяти и выявить проблемную плашку, если таковая имеется.
4. Устранение изменений в реестре
 Сам пользователь, различные приложения, а также вирусы могут вмешиваться в работу реестра компьютера, изменяя различные параметры. Чаще всего пользователь вносит изменения в реестр взвешенно, выполняя действия на основе собственного опыта или авторитетных советов. Однако некоторые изменения реестра могут повлечь за собой ошибки, такие как Kernel Security Check Failure.
Уверенность, что ошибка 0×00000139 в работе Windows 10 не связана с изменениями в реестре, можно получить, если выполнить его восстановление из резервной копии.
5. Проблемы с драйверами
Еще одна причина, почему появляется ошибка Kernel Security Check Failure, это неактуальная версия драйверов и возникновение конфликтов между ними и операционной системой. В такой ситуации рекомендуется обновить драйвера до последних версий, скачать которые всегда можно с сайта-производителя компонента компьютера: видеокарты, материнской платы, центрального процессора и так далее.
Важно: Требуется обновить не только драйвера компонентов компьютера, но и BIOS до последней версии
Part 1. Fix BSOD KERNEL SECURITY CHECK FAILURE using Windows Environment.
Method 1: Force Windows to Full Shutdown.
Perform a full shutdown of your system in order to re-initialize Windows at boot. To do that:
1. Click at the Power button and while holding down the SHIFT key on your keyboard, click Shutdown.
2. Power ON your computer again.3. Check if the «BSOD KERNEL SECURITY CHECK FAILURE» problem has resolved. If it does, then disable the fast start-up feature permanently.
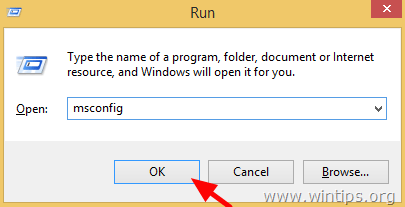
Method 2. Perform a Clean Boot.
The second method to resolve the «KERNEL SECURITY CHECK FAILURE» blue screen error, is to load Windows with the minimal set of drivers and programs in order to find out if a device driver or program cause your system to crash. To perform a clean boot:
1. Press Windows + “R” keys to load the Run dialog box.2. Type msconfig and press Enter to open System Configuration utility.
3. At Services tab, check the Hide all Microsoft services checkbox and click the Disable all button.

4. Then select the Startup tab and click Open Task Manager.
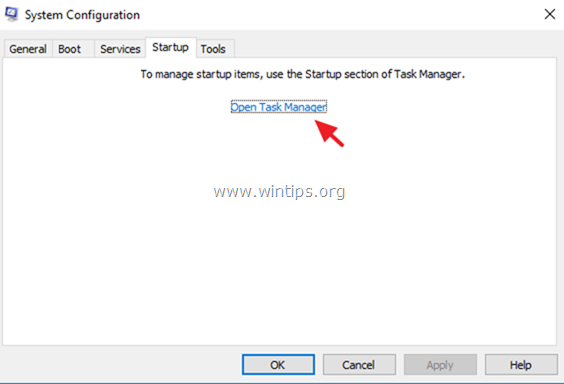
5. Select one by one all startup programs and click Disable.
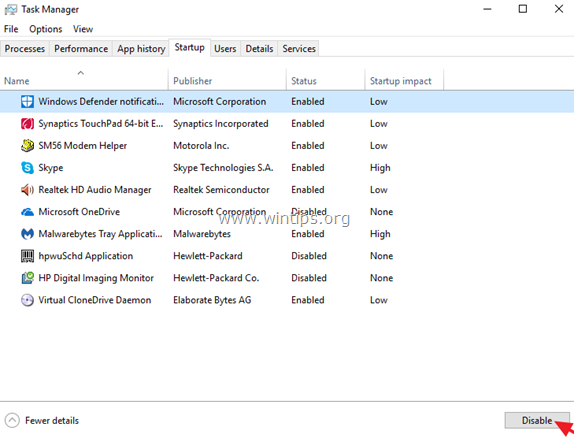
6. Close Task Manager.7. Press OK at System Configuration utility and restart your computer.8. If after the restart, your computer is working without problems, then probably a device driver or a software that was running at Windows startup, caused the problem. At this case, run the System Configuration utility again and enable one-by-one the disabled programs and services (and restart), until you find out which one caused your system to crash.
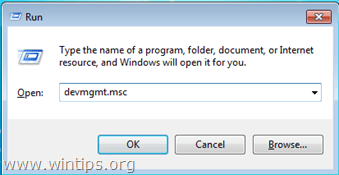
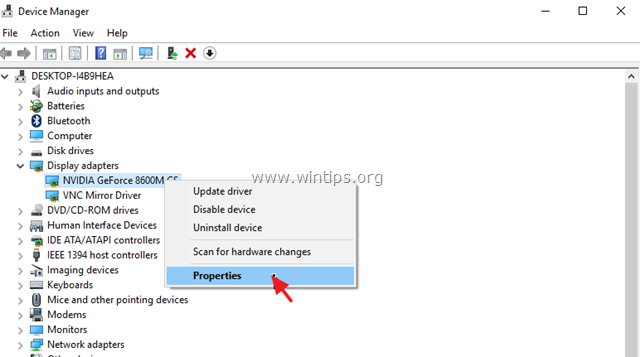
Method 3. Rollback or Update the Driver for the Display Adapter (VGA).
Commonly the «KERNEL SECURITY CHECK FAILURE» error happens after updating the driver for your display adapter driver or because – at fresh Windows installations – the correct display driver is not installed. To resolve these problems:
1. Press Windows + “R” keys to load the Run dialog box.2. Type devmgmt.msc and press Enter.
3. In device manager, expand the Display Controllers.
4. Right click on the installed Display Adapter * and select Properties.
* Note: If you see here a «Standard Microsoft Display Controller», then download and install from the manufacturer’s support website, the latest drivers for the display adapter.
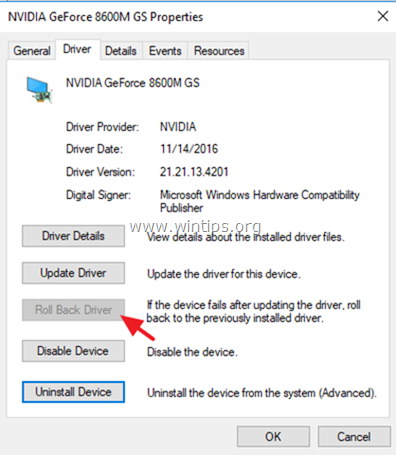
5. Select the Driver tab and perform the following actions:
a. If the Roll Back Driver button is active, then press it to rollback to the previous version of the display driver.
b. If the Roll Back Driver button is inactive (like in screenshot below), then navigate to VGA manufacturer’s support site to download and install an older driver version for your display adapter.
6. If any of above steps, doesn’t resolve the KERNEL SECURITY CHECK FAILURE blue screen issue, then completely uninstall the display adapter from your system and reinstall. To do that:

7. Restart your computer.8. After the restart, proceed and reinstall the necessary driver software for your VGA device.
Method 4. Scan & Repair Windows System files.
1. Open Command Prompt as Administrator. To do that:
2. In the command prompt window, type the following command & press Enter:
sfc /scannow

3. Wait until Windows scans and repairs the system files.4. When the System file check and repair is completed, restart your computer and check if your computer works smoothly.
Method 5. Check and Repair File System with CHKDSK.
Then next step is to check the hard drive for problems by using the CHKDSK command. To do that:
1. Open an Command Prompt as Admin.2. In the command prompt window, type the following command* and press Enter:
chkdsk C: /f /r
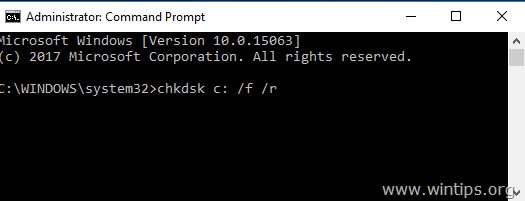
3. When the CHKDSK command operation is completed, restart your system.
– if none of the above methods solved the problem, then navigate to .
В чем причина проблемы?
Ошибка, содержащая код Kernel Security Check Failure, выскакивает в самый неподходящий момент. Пользователь может сидеть в браузере, смотреть фильм, играть или заниматься работой. Тип действующей операции никак не влияет на возникновение неполадок.
Однако ошибка не появляется на пустом месте. Она выскакивает по следующим причинам:
- устаревшие драйверы оборудования;
- повреждены файлы реестра;
- проблемы с BIOS;
- перегрузка системы.
Несмотря на то, что ошибка прерывает работу пользователя и не дает ему сохранить изменения, проблема решается без помощи специалиста. Каждое действие из предложенных ниже инструкций может выполнить даже новичок.
KERNEL SECURITY CHECK FAILURE в Windows 10: как исправить?
Много неприятностей доставляет синий экран с кодом остановки KERNEL_SECURITY_CHECK_FAILURE, при котором Windows 10 внезапно зависает, и в итоге теряем несохраненные данные. Эта ошибка часто наблюдается на компьютерах, укомплектованными двумя графическими устройствами — интегрированным видео ядром Intel HD и дискретной видеокартой NVIDIA — при запуске Фотошоп, других программ Adobe и прочих несвязанных с ними приложений, которые интенсивно используют ресурсы графического процессора.

Через синие экраны BSOD теряет не только несохраненные данные, но и возможность работать с затронутыми программами. С другой стороны они полностью исправимы. За этой проблемой нет ни одной конкретной причины – есть много разных составляющих, которые могут ее породить.
Установка графического процессора по умолчанию для проблемной программы
Когда компьютер оснащен двумя видеокартами, то часто причина ошибки KERNEL_SECURITY_CHECK_FAILURE заключается в том, что при запуске программа пытается использовать интегрированную графику Intel HD вместо более мощного графического процессора NVIDIA. В этом случае проблему можно решить путем установки графического процессора по умолчанию для всех приложений, при запуске которых наблюдаем ошибку. Для применения этого решения выполните следующие шаги:
Кликните правой кнопкой мыши на ярлыке приложения, которые вызывает ошибку KERNEL_SECURITY_CHECK_FAILURE. В контекстном меню выберите «Запустить с графическим процессором» и измените его по умолчанию.
Откроется панель управления NVIDIA. В поле выберите программу для настройки уже будет указано требуемое приложение.
Раскройте выпадающее меню «Выберите предпочтительный графический процессор для этой программы». Укажите высокопроизводительный процессор NVIDIA.
Сохраните внесенные изменения нажатием на кнопку «Применить», затем перезагрузите компьютер.
Теперь приложение должно быть успешно запущено. Сделайте те же действия для других приложений, при запуске которых сталкиваетесь с ошибкой KERNEL_SECURITY_CHECK_FAILURE. Если синий экран по-прежнему возникает, перейдите к следующему шагу.
Обновление драйвера видеокарты NVIDIA
Во многих случаях удается решить ошибку KERNEL_SECURITY_CHECK_FAILURE путем обновления драйвера видеокарты NVIDIA до последней версии.
Откройте сайт NVIDIA GeForce и перейдите в раздел расширенного поиска.

Укажите тип, серию и точное название модели, операционную систему, язык и нажмите кнопку «Поиск». Отобразится список программного обеспечения по дате. Загрузите на компьютер последнюю или предпоследнюю версию.

Запустите загруженный файл, следуйте инструкции на экране до завершения установки драйвера. После успешного обновления проверьте, удалось ли исправить ошибку KERNEL_SECURITY_CHECK_FAILURE.
После успешного обновления проверьте, исправлена ли проблема.
Если синий экран возникает при запуске Фотошоп, то решить проблему можно путем удаления файла sniffer.exe (или sniffer_gpu.exe).
Откройте Проводник и перейдите в каталог:
C:\Program Files\Adobe\Adobe Photoshop (версия)
Примечание: Если Windows установлен на другом диске, замените букву «С» на соответствующую.
В каталоге найдите sniffer.exe и переместите его в другое место, например, на рабочий стол.
После перезагрузки компьютера попробуйте запустить Фотошоп. Если при его запуске ошибки KERNEL_SECURITY_CHECK_FAILURE не наблюдаете, удалите файл с рабочего стола.
Проверка целостности системы
С помощью встроенных утилит SFC и DISM можно также исправить эту критическую ошибку. Эти инструменты предназначены для проверки целостности системы.
Откройте Диспетчер задач путем выполнения команды taskmgr из окна интерпретатора (Windows + R).

Перейдите в верхнем меню на вкладку «Файл» и выберите новую задачу. Наберите «powershell», установите флажок на поле создать с правами администратора.

Для сканирование компьютера выполните команду:
sfc /scannow
Если в результате проверки были обнаружены поврежденные файлы, но Windows не удалось их исправить, запустите команду:
DISM /Online /Cleanup-Image /RestoreHealth

Последняя команда требует доступ в интернет, поскольку загружает копии для замены поврежденных файлов из Центра обновления Windows.
После успешного выполнения проверьте, появляется ли синий экран.
Resolutions to fix KERNEL_SECURITY_CHECK error in Windows 10/8/7
Here in this part, you’ve three reliable methods to effectively fix and get rid of KERNEL_SECURITY_CHECK failure error in Windows 10/8/7 and you may selectively follow either one to get this issue fixed now:
Before you start, it’s highly recommended for you to do a full scan on your computer to remove possible virus or malware with anti-virus software. You can watch the video first and then read the details:
Method 1. Repair System file and bad sectors that cause Kernel Security Check failure issue
Run System File Checker:
1. Type: cmd in the search box and right-click on Command Prompt > Select Run as administrator;
2. Click Yes to continue with administrator permission;
3. Type: sfc /scannow and hit Enter to check and repair corrupted system files which may cause BSOD error with Kernel Security Check failure;
Run partition manager:
If system hard drive or partition has bad sectors, Windows system won’t be able to boot normally. Instead, a BSOD error may come up.
Fortunately, powerful partition manager software from EaseUS will effectively help fix this issue with its Check Partition feature:
Step 1. Right-click the target partition that has a problem.
Step 2. Choose «Advanced» > «Check File System».
Step 3. In the Check File System window, check the «Try to fix errors if found» option.
Step 4. Click «Start» to check errors on your partition.
Method 2. Scan and fix system hard disk error
1. Click Start > File Explorer > This PC;
2. Right-click the hard drive that you need to check and scan > Select Properties;
3. Go to Tools tab > Click Check;
There, the Error Checking tool will automatically check and fix system hard disk error that may cause a Kernel Security Check failure issue in Windows PC.
Method 3. Run Memory Diagnostic Tool to fix the Kernel Security Check failure issue
1. Press Win + R keys to open Run dialog > Type: mdsched.exe and hit Enter;
2. Choose Restart now and check for problems (recommended) to check the status of memory card right now;
Or select Check for problems the next time I start my computer;
3. Then The Memory Diagnostic Tool will automatically run to check errors on Memory card in your PC.
If no errors are checked, your memory card is working perfectly fine with no problem;
If errors are detected, change the current memory card with a new one so to get rid of BSOD with Kernel Security Check failure error.
Method 4. Try System Restore to repair PC from Kernel BSOD issue
1. Boot PC into Safe Mode; (You may follow guidelines in Quick Fix so to boot PC into the Safe Mode.)
2. Click Control Panel on Start > Choose Recovery in All Control Panel Items;
3. Click Open System Restore > Check Choose a different restore point > Next;
4. Select the exact restore point (healthy Windows restore point) which you’ve created previously and click Next > Next to continue;
5. Click Yes to confirm that you want to execute the System Restore operation.
Wait to let the System Restore process complete and then you’ll get your previous Windows system back. There, no Kernel Security Check error or BSOD issue will exist then.
Troubleshoot problems with Windows hard drive and files
The Kernel Security Check Failure error can be caused by a hard drive failure or file system corruption. If we want to check the hard disk we will follow the following steps:
- Start Menu.
- We write CMD and select it with the right button to run it as administrator.
In command prompt we would execute this command:
This would be the case, as long as C: is the partition that contains the operating system, which is the majority of the time. These are the results that we would obtain, the only thing to do afterwards is press S to check the hard disk:
On the other hand, if what we want to do is check the system files, then as in the previous case, in a command prompt window with administrator permission we will write this command:
These are the results we have obtained:
Here it tells me that it has found bugs and has repaired the files successfully. If everything is fine, it will reply that it has not found any problem with the integrity of the files. Also another command that we can run as an administrator, and allows maintenance and preparation of Windows images is this:
This would be the command after executing it without encountering problems:
Then, obviously, after executing any of these commands a system reboot is required.
8. Perform a Factory Reset
If you’ve tried all the above methods but still couldn’t fix the kernel security disk failure error in your Windows 10, as a last resort, you can factory reset your PC to start everything from a clean slate.
There are two modes of a Windows reset: a complete reset and a reset that re-formats Windows 10.
We suggest you go with the reset everything option so that you don’t have malicious software or damaged files left around to cause you a problem again.
Before you go ahead with a complete reset, though, make sure that you backup your important files. The full reset option deletes everything.
To get started, press Windows Key +I to open Settings, then head to Update & Security > Recovery > Get Started. From there, click on Remove Everything and follow the instructions ahead for a smooth reset. After the reset, Windows 10 will reinstall with the files and drivers that came from the manufacturer.
For a detailed step-by-step approach, you can check our Windows factory reset guide from below.
