Ошибки speedfan и способы их устранения
Настройка через BIOS
Эффективность охлаждающей системы можно повысить с помощью настроек в биос. Большинство ноутбуков оснащены функцией, которая контролирует процесс охлаждения. Поднимаем мощность кулера следующим образом:
Войдите в BIOS, нажав перед загрузкой клавишу «Delete»

- Найдите вкладку «Advanced»
- Настройка «Smart Fan Configuration»
- Напротив пункта CPU Smart Fan поставьте значение «Auto»

Откалибруйте кулер в графе «Smart Fan Calibration», нажав «Enter»

Откройте «Control Mode»

Выберите одну из трех функций: «Quiet» (поддержка оптимальной температуры), «Performance»(при больших нагрузках процессора), «Manual»(пользовательский режим)

Нажимаем «Exit» и сохраняем изменения.

В завершение выполните перезагрузку компьютера и протестируйте его под нагрузкой.
Принцип работы
Как известно, центральный процессор – это самая большая и важная микросхема компьютера, потребляющая большое количество энергии, и, как следствие, выделяющая много тепла при работе. По этой причине процессор требует эффективных средств для своего охлаждения. Одним из самых простых, надежных и недорогих устройств охлаждения процессора является вентилятор или кулер. Вентилятор крепится поверх радиатора процессора и помогает эффективно отводить от процессора теплый воздух, нагревающийся при его работе.
Однако такие недорогие активные средства охлаждения, как вентиляторы, имеют один значительный недостаток. В том случае, если вентилятор процессора выйдет их строя, он может или совсем остановиться, или уменьшить число оборотов ниже необходимого для эффективного охлаждения значения. Такая ситуация может привести к значительному повышению температуры CPU, и как следствие, к выходу процессора из строя.
Поэтому мониторинг такого параметра, как скорость вращения кулера, жизненно важен для поддержания работоспособности компьютера. Именно для этой цели, для отслеживания скорости вращения вентилятора в BIOS и существует специальная опция. Как правило, эта опция имеет лишь информационное назначение, и ее параметры нельзя менять. Однако в некоторых BIOS существует возможность отключения мониторинга.
Опцию обычно можно найти в категории опций, предназначенных для мониторинга основных параметров компьютера. Например, это может быть раздел PC Health Status или страница Power, подраздел Hardware Monitor, и т.д.
Скорость вращения вентилятора обычно измеряется в оборотах в минуту (англ. rpm). Таким образом, значение 3000 rpm в опции означает скорость вращения в 3000 об/мин или 50 об/c. В некоторых BIOS показатель скорости может отображаться разными цветами. Например, в случае соответствия скорости вращения норме число пишется синим цветом, а в случае снижения скорости ниже нормы – красным.
Иногда в опции CPU Fan Speed можно встретить устанавливаемое значение Ignore (Игнорировать) или аналогичное ему значение Disabled (Отключить). Установка этого значения позволит не отслеживать скорость вращения вентилятора процессора.
Подготовка
Если компьютер раньше работал тихо и лишь недавно начал создавать много шума, вполне вероятно, что решить проблему можно простой чисткой системного блока от пыли. Возможно, придется также смазать кулеры. Об этом читайте здесь
В некоторых случаях улучшить охлаждение процессора и существенно снизить шум его вентилятора удается за счет замены термопасты.
В случае, если указанные выше действия проблему не решили, можно снизить интенсивность вращения одного, самого “шумного”, или нескольких вентиляторов в системном блоке.
Но перед этим необходимо:
1.
Установить на компьютере программы, позволяющие контролировать температуру основных его “греющихся” устройств, а именно:
• Speed Fan
– программу, позволяющую контролировать температуру всех устройств компьютера в режиме реального времени;
• Prime 95
– программу, которая создает высокую нагрузку на центральный процессор. Позволяет проверить стабильность работы процессора и эффективность его системы охлаждения в экстремальных условиях. Подробнее о проверке процессора при помощи этой программы читайте здесь.
• FurMark
– программу для тестирования графической системы компьютера. Она создает повышенную нагрузку на видеокарту, контролируя при этом ее температуру и стабильность работы.
2.
Используя эти программы, проверить температурный режим работы процессора, видеокарты, жесткого диска и чипсета материнской платы компьютера.
В большинстве случаев при максимальной нагрузке температура жесткого диска не должна превышать 45 градусов С, процессора и чипсета материнской платы – 60 градусов С, видеокарты – 85 градусов С.
“Нагрузить” жесткий диск можно без специальных программ, например, запустив процесс архивации или копирования находящегося на нем большого файла (фильм, образ диска и др.).
Если температура какого-то устройства окажется близкой к указанным выше показателям, снижать обороты охлаждающего его кулера не следует.
В случае же, когда до максимальных показателей еще далеко, интенсивность вращения вентиляторов можно уменьшить, используя описанные ниже способы.
ВАЖНО. После снижения оборотов не забывайте проверять температуру охлаждаемых кулерами устройств
Не допускайте их перегрева. Помните, что длительная работа компьютера в неблагоприятных температурных условиях снижает его долговечность.
2. EasyTune 5
EasyTune 5 is more than just laptop fan control software. It comes with many other features that you may not have realized you needed. One of those features is EasyTune 5’s Smart-Fan Control.
With EasyTune 5’s Easy Mode and the Fan-Control feature, you can directly control how fast and slow your CPU cooler’s fan runs, which would directly impact the performance and temperatures of your computer.
Also, to get the most optimized cooling, you can set your CPU fan speed to correlate your CPU’s temperature, so they both are in sync and give you the best performance.
Along with fan control, EasyTune 5 can also help you overclock your CPU. EasyTune 5 comes with CPU Intelligent Accelerator (CIA) and Memory Intelligent Booster 2 (MIB2) to help you get more performance out of your CPU and memory.
Почему вентиляторы шумят и какие есть способы это исправить
За исключением особых безвентиляторных модификаций, в каждом компьютере установлено два и более кулера: в блоке питания, на процессоре, видеокарте, в корпусе и другие. И каждый по-своему шумит, и это плохая новость. Многие просто привыкли к шуму своего системника и считают что так и должно быть. Может быть и должно, но необязательно! В 99% случаев шум от компьютера можно уменьшить на 10%-90%, и это хорошая новость.
Как вы уже поняли, бесшумность достигается уменьшением шума от кулеров. Это возможно с помощью применения более тихих, по своей природе, кулеров, либо с помощью уменьшения оборотов уже имеющихся. Естественно, уменьшать скорость можно до значений не угрожающих перегреву компьютера! В этой статье речь пойдёт именно об этом способе. Ещё больше снизить шум помогут программы для уменьшения треска от жёсткого диска.
Итак, чтобы уменьшить обороты вращения кулера можно использовать один из вариантов:
- Программа для управления скоростью вращения кулеров
- «Интеллектуальная» система контроля оборотов, зашитая в BIOS
- Утилиты от производителя материнской платы, ноутбука или видеокарты
- Использовать специальное устройство – реобас
- Искусственно занизить напряжение питания вентилятора
У кого нормально работает управление из BIOS, могут дальше не читать. Но частенько BIOS лишь поверхностно регулирует обороты, не занижая их до бесшумных, и при этом всё ещё приемлемых, значений. Утилиты от производителя, порой, единственный способ влияния на вентиляторы потому что сторонние программы часто не работают на необычных материнских платах и ноутбуках. Разберём самый оптимальный – первый способ.
Почему не работает SpeedFan
SpeedFan может показаться не самой простой программой на первый взгляд. И ошибки часто связаны с невнимательностью пользователя и неправильной настройкой программы. Но иногда дело может быть в проблемах с железом и системой.
SpeedFan не запускается при включении компьютера
В SpeedFan отсутствует опция загрузки при запуске системы. К счастью, в Windows практически любую программу можно добавить в автозагрузку, просто поместив ее ярлык в соответствующую папку. В Windows XP это работает без проблем. Но в Windows 7 и 8 с этим могут возникнуть трудности. Все дело в том, что запуск программ, чьи ярлыки помещены в директорию автозапуска, блокируются UAC. Его не поможет преодолеть даже запуск программы с правами администратора, но решение есть.
В Windows есть встроенный инструмент под названием «Планировщик задач». Чтобы его открыть, нужно сделать следующее:
- Открываем меню «Пуск».
- Заходим в Панель управления.
- Находим иконку «Система и ее обслуживание» и кликаем по ней.
- Переходим к пункту «Администрирование».
В планировщике создаем задачу и указываем ее имя по своему усмотрению. Обязательно отмечаем пункт «Выполнить с наивысшими правами». Разворачиваем раздел «Триггеры», создаем задачу, указав «Начать задачу при запуске».


Тут в дополнительных параметрах нужно настроить отложенный запуск на любое количество секунд.
Справка! Удобнее всего запускать Планировщик заданий не через Панель управления, а с помощью окна «Выполнить». Достаточно нажать комбинацию клавиш Win + R, а затем прописать в окне команду «Taskschd.msc».
SpeedFan не видит процессор
Обычно в программе температура процессора отображается таким образом:

Но, что делать, если в главном окне нет пункта CPU?

Тут есть несколько вариантов:
- Данный процессор не поддерживается программой.
- Пункт CPU есть, но он не умещается в отображаемый в главном окне список. В этом случае нужно нажать на «Конфигурация», открыть вкладку «Температуры» и отключить ненужные пункты, либо просто передвинуть их вниз, чтобы пункт CPU показывался выше.
- Пункт имеет другое название, например, Temp Чтобы определить, какой пункт отображает температуру процессора, лучше использовать стороннюю программу, к примеру, AIDA 64.
- Температура отображается для каждого ядра процессора отдельно, при этом они называются Core0, Core1 и т. д.
SpeedFan не сохраняет настройки после перезагрузки
При изменении любого параметра в программе необходимо нажимать кнопку ОК, чтобы подтверждать изменения. Без нее они не сохранятся.
Чтобы сохранить параметры конфигурации утилиты SpeedFan в отдельном файле с целью их экспортирования после переустановки программы, необходимо сделать следующее:
- Кликаем правой кнопкой мыши по ярлыку программы на рабочем столе, в контекстном меню выбираем пункт «Расположение файла».
- В каталоге находим 3 файла: speedfansens.cfg, speedfanparams.cfg и speedfanevents.cfg. Копируем их в любую директорию по желанию.
Важно! Если полностью удалить программу и установить заново с чистого листа, то можно переместить эти 3 файла в папку с утилитой, и конфигурация восстановится.
С помощью SpeedFan можно управлять кулерами, не копаясь при этом в BIOS. При использовании SpeedFan нечасто возникают ошибки, а если они и бывают – проблемы чаще всего заключаются в железе или неправильных настройках, заданных пользователем. В любом случае, эти проблемы легко решаемы, если только вы не пользуетесь очень старым оборудованием, которое просто не будет поддерживаться программой.
SpeedFan не видит вентиляторы
Часто пользователи встречаются с проблемой, когда программа SpeedFan не видит один или все кулеры на компьютере или ноутбуке. Что делать в этом случае в первую очередь:
- Если же проблема на компьютере, то обязательно проверяем включение всех вентиляторов напрямую в материнскую плату, поскольку если подать питания сразу с блока питания, то программно контролировать скорости никак не получится.
- Дальше если же Вы используете ноутбук, тогда в Bios ищите пункты, связанные с автоматической регулировкой вентиляторов. Нужно искать CPU Fan Control, CPU Q-Fan Control или даже CPU Smart Fan Control и отключить их установив значение Disabled.
После этих действий проблема когда программа SpeedFan не видит вентилятор на ноутбуке будет решена. А также есть очень старые материнские платы, которые не поддерживают изменение скорости вентиляторов вовсе.
Выводы
Программа SpeedFan обладает действительно отличным функционалом и предлагает мощные инструменты для контроля температуры комплектующих. Но бонусом есть дополнительная функциональность, такая как возможность наблюдать за графиками температуры или даже проверить состояние жёсткого диска.
How to Increase Fan Speed on Laptop Windows 10 – Make The Fan Speed Higher
To control laptop fan speed on Windows 10 you can apply the below-mentioned methods. If you have a gaming laptop you should definitely keep a close eye on your CPU fan RPM.
Method 1 – Adjust Fan Speed Settings on Windows 10 via Control Panel
Use a built-in laptop fan control Windows feature to change the fan speed. Open your Control Panel and follow the instructions.

- Open “Control Panel” and click on “Hardware and Sound,” and then “Power Options.” A new window will appear.
- Click “Change Plan Settings,” and then “Change Advanced Power Settings.” The “Power Options” dialog box will appear.
- In the “Advanced Settings” tab click on the “Processor Power Management” associated with a plus symbol to open an options submenu.
- Select “System Cooling Policy” from the submenu.
- Click the down arrow under “System Cooling Policy” to reveal a drop-down menu.
- Select “Active” from the drop-down menu to increase the speed of your CPU’s cooling fan.
- Click “Apply” and then “OK.”
Method 2 – Control Fan Speed on Laptop Windows 10 PC Using BIOS/UEFI
The second best method to control the fan speed on Windows 10 PC is using BIOS. Depending upon your PC or laptop model and motherboard manufacturer they have fan control settings in the BIOS/UEFI.
To do that you have to dive into the BIOS, follow one of these two methods.
- Either, restart your computer, and when it boot-up press and hold the “Delete” or “F12” key.
- Or, press Windows + I to open Settings > Update & security >Recovery > Advanced Startup >Restart Now > Troubleshoot >Advanced options > UEFI Firmware settings >Click Restart.
Once you have entered BIOS
- Use the arrow keys on your keyboard to locate Fan Speed Control options. This option may vary but you can always find system fan speed control settings.
- Go to Monitor > Status > Fan Speed Control.
- Look for RPM settings for your computer fan. Select the fan to increase its speed i.e. 400 RPM or 500 RPM, and press Enter
- Repeat the same step No. 4 for all the fans you would like to increase the speed for.
- Press Esc repeatedly until you find the Exit menu.
- Select the “Save Changes and Reset” option to confirm the fan speed changes; your computer will now automatically restart.
Alternatively, you can also find fan control settings in the BIOS here,

Locate Hardware Monitoring screen or Advanced Tab then find PC Health Status. Here you will find
In the BIOS typically you can adjust the optimal CPU temperature range at which the fan will speed up, and often the speed itself.
10: Thinkpad Fan Controller (TPFanControl)
Well, this PC fan speed controller software is somehow able to manage a place at 10th position in the list. This free utility is working to reduce the fan noise in the notebooks.
So, let’s have a look at the best TPFanControl features, and know-how worthy it is:
- Monitor CPU and GPU temperatures by running in the background
- Adjust fan speeds for perfect cooling
- Show the notification icon of the CPU and GPU temperature.
- Control the system and CPU fan speeds by spinning up the fan only to keep the temperature low
- Supports 32-bit & 64-bit Windows and all Windows operating system
Well, it is found that after installing the software it works dramatically.
Pros
- Freeware utility
- Display alerts in the notification tray
- Control fan noise
Cons
- Not for the beginners
- Causes overheating
- Not working with new models
- Limited and strict interface
In order to know more about the comfort PC fan controlling software visit the official website and learn how it works on your Window system:
Почему появляется ошибка «CPU Fan Error! Press F1»
В самом начале работы компьютера и в последующем система UEFI (или BIOS) обеспечивает правильное напряжение для оборудования и следит за его работой, в том числе за оборотами вентиляторов. Их статус определяется с помощью выявления частоты вращения лопастей, что можно регулировать в UEFI (BIOS).
А ошибка «CPU Fan Error» возникает при выявлении системой пониженного числа оборотов кулера или его полной остановки. Стоит ли говорить, что система активного охлаждения процессора обеспечивает для него рабочие температуры. Без кулера любая трудоемкая задача быстро приведет к перегреву устройства, так что неслучайно компьютер предупреждает пользователя о возникшей проблеме.
Reasons for Fans Being Too Loud
First things first, you might be wondering just how your fans got so loud in the first place. The most common reasons are as follows.
- Your PC has to do a lot of heavy lifting, i.e., you play a lot of video games or use video editing software and such.
- Your CPU and GPU are overworked and overheated. (Remember to stress test these often).
- Sometimes the problem may be as simple as dust accumulation, in which case all you need to do is open up the hardware and give it a good cleaning.
Older systems have this problem more often, so if you were already planning on switching to a new one then that’s fine. But, if you would rather just fix this problem instead of going through the hassle of getting a new PC, then read on as we explain how to control CPU fan speed.
HW Monitor

HW Monitor is another free fan speed monitor software for Windows. Through this software, you can monitor the real-time speed of your CPU fan and up to 3 cabinet fans. Along with real-time fan speeds, it also shows the minimum and maximum recorded fan speeds of both CPU and cabinet fans on its interface. Apart from fan speeds, you can monitor Motherboard voltage, Processor’s voltage, Temperature of every core of the processor (both in Celsius and Fahrenheit), System power usage in watts, HDD temperature, GPU temperature, etc. All the data that you see on its interface can also be saved as TXT file. Overall, it is simple and straightforward software to monitor CPU and Cabinet fan speeds.
SYS_FANS, CHA_FANS, etc
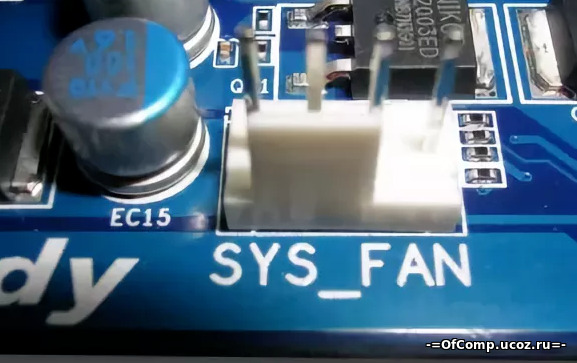
Image Credit: ofcomp.ucoz.ru
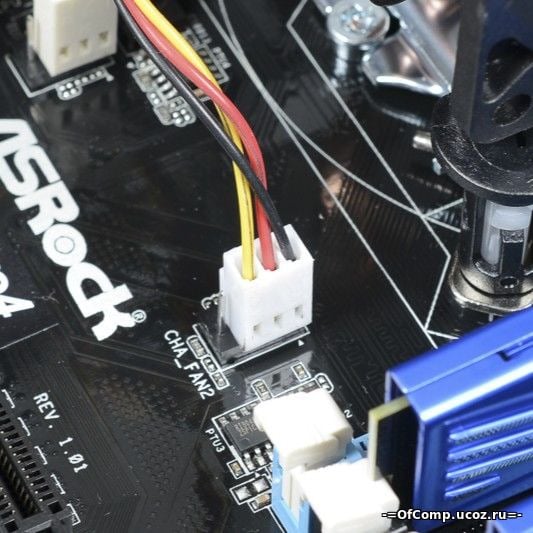
Image Credit: ofcomp.ucoz.ru
And while we’re at it, we might as well address these as well.
I’m sure you’ve already figured it out from the name. These are the headers you connect your case fans to and are meant for differentiating fan-control.
They’re like CPU_OPT, but not connected to the thermals of the CPU. So you’re free to tinker with them and increase or decrease them according to your GPU thermals, CPU thermals, Case thermals, or whatever you wish.
And there are a wide variety of such headers on modern motherboards—mostly focused on helping water cooling. Let’s rejoice that the days of plugging in 20 different things to one or two headers are thankfully over.
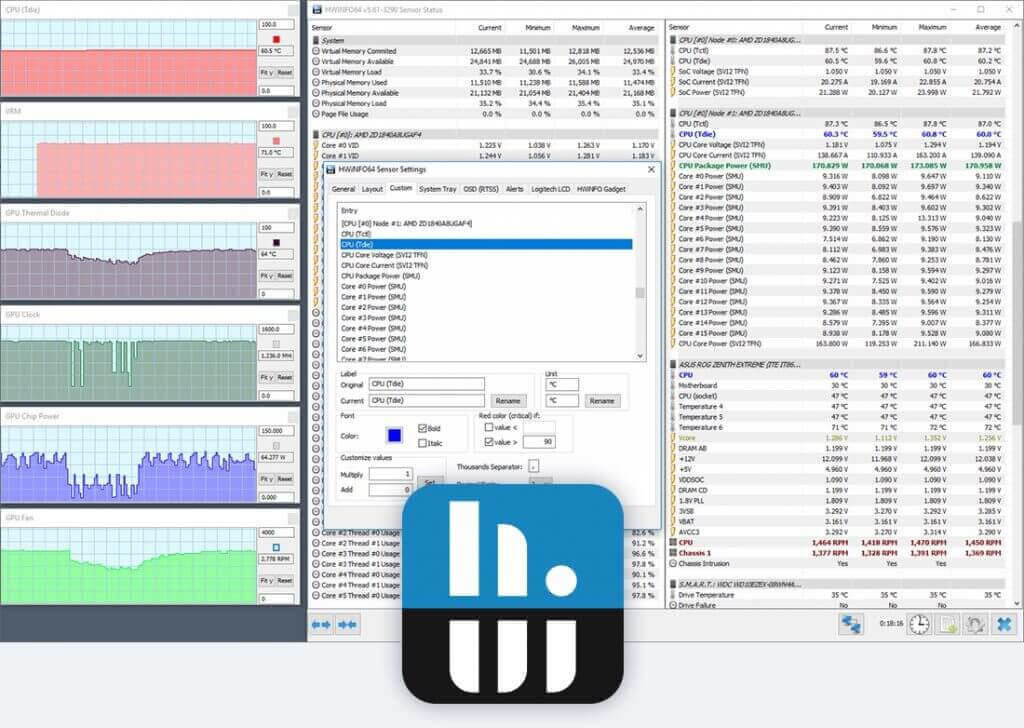
HWiNFO

HWiNFO is the next free fan speed monitor software for Windows. It is a very handy monitoring software through which you can monitor real-time CPU and cabinet fans’ speeds. It provides a dedicated monitoring section from where, you can monitor various parameters including fan speeds like CPU temperature, motherboard temperature, HDD temperature, CPU usage, GPU usage, CPU package power, iGPU power, Core clock, RAM usage, and more. A full report containing all the values of different parameters can also be saved in a CSV file. Apart from monitoring, you can also find out every possible information about your system like CPU and GPU code names, CPU turbo frequency, RAM type, BIOS information, Sensors info, and more.
EasyTune 5
With EasyTune 5, you get more than just a tool to monitor and control your fans’ speeds. The program also has a bunch of other useful features at your disposal that you probably didn’t know you needed.
The EasyTune 5 feature we’re most concerned about here is the Smart-Fan control. This feature gives you direct control over your CPU cooler’s fan. With the Easy Mode, you can configure this feature with ease.
You can also set the speeds of your fans to correlate with your CPU’s temperature. Just keep in mind that you don’t want to set a threshold that is too high, as doing so could prevent your CPU from getting the airflow it needs to operature correctly.
If you’re also looking for a program that can help you overclock your CPU, EasyTune 5 can assist you there as well. You can get much more power and performance out of your CPU and memory with the CPU Intelligent Accelerator (C.I.A.) and Memory Intelligent Booster 2 (MIB2) features. These features can be found in the program’s Advanced Mode.
7: HWiNFO
HWiNFO fan control is also a freeware software for Windows. This is a useful software that allows you to do various tasks rather than changing fan speeds on a computer and is pretty amazing.
Learn several best features of HWiNFO PC fan controller software:
- It is a very handy software that allows adjusting immediate CPU and cabinet fan speeds
- With this, you can monitor several system components like CPU, motherboard, HDD temperature, CPU & GPU usage, CPU package power, GPU power, Core clock, RAM usage, and more
- Also provide information about system CPU and GPU code names, CPU turbo frequency, RAM type, BIOS information, Sensors info, & more.
- Store a full report containing entire values of different parameters in a CSV file
- Supports latest technologies & standards.
- Works with both 32-bit and 64 bit Windows
- Compatible with Windows Vista, Windows XP, Windows 7/8 & 10
So these are some of the features of the HWiNFO fan control software.
Pros
- The customizable interface provides plenty of options
- Is free utility
- Offers several reports types, system monitoring using 3rd party add-ons or other tools.
- Portable version is offered
Cons
- Report generation provide blank details for deselected items
- Limited and controlled integration
- Offers limited details than the similar programs
If you are willing to learn more about and download the Windows 10 fan control software then visit the official website:
Bilgisayarınızın her yönünü izleyin
SpeedFan , Windows Görev Yöneticisi’nin çok temel olduğunu düşünen kullanıcılar için bir izleme programıdır . Sabit sürücülerinizin sağlığını, farklı bileşenlerin sıcaklığını izlemenizi ve fanların hızını değiştirmenizi sağlar.
SpeedFan’ın ana arayüzü ilk başta korkutucu olabilir, ancak veri sızıntısını geçtikten sonra, en zor PC sorunlarının giderilmesine yardımcı olabilecek çok güçlü bir uygulama ile karşılaşırsınız. SpeedFan, PC’nizin BIOS’undan bile daha fazla işlevsellik ve bilgi sunar.
SpeedFan ilk başta kullanmaktan korkuyor olsa da, varsayılan olarak, daha az gelişmiş kullanıcıları, programın içinde dolaşmanın tehlikelerine karşı uyarır. Program size birçok sayı çıkarsa da, geliştirici neler olup bittiğini anlamanıza yardımcı olacak grafikler, grafikler ve metreler gibi bazı UI öğeleri de içeriyordu.
Daha ileri düzey kullanıcılar SpeedFan’ı, stress testi yapmak ve özel bir PC yapısını izlemek için Prime95 gibi bir programla birlikte kullanabilirler. Bu araçlar PC’nizin kararlılığını test etmek için gerçekten kullanışlıdır.
SpeedFan acemi ve uzman hem de yararlıdır. Novices, programı kendi bilgisayarlarının durumunu kontrol etmek ve hayranlarının hızını kontrol etmek için kullanabilir (özellikle bir dizüstü bilgisayar için yararlıdır). Daha ileri düzey kullanıcılar ise SpeedFan’ın sağladığı sorun giderme ve performans izleme özelliklerinden yararlanabilir.
PC performansı ve istikrarı konusunda ciddi olan herkes SpeedFan’dan yararlanabilir.
-Yüksek derecede iyileştirilmiş DELL desteği -nVidia I2C desteği tekrar 275+ -now ATI Radeon desteği ile çalışır. SpeedFan başlatıldığında Manuel Fan Kontrolü’nü sıfırladı (program çıkışında% 100’e daha fazla beklenmeyen video kartı fanı ayarlandı) Sunucular için Intel X79 (Patsburg) SMBus desteği. USB muhafazaları için SMBus destekli SAT desteği — SunPlus, IoData ve Logitech chipset’leri kullanan USB muhafazaları için verilen destek — çeşitli Intel anakartlar için ayarlanmış voltaj okuma ayarları ve yapılandırmaları — tam destek Fintek F71858AD için -Arrison Areca RAID desteği ve Areca SAS denetleyicileri için geliştirilmiş destek -sadece hafif bir şekilde yeniden yapılandırılmış sabit disk USB satıcısı tahmin etme-AMD Ailesi için uygun destek 12h (LLano) AMD Family 14h (Bobcat) sıcaklığı için destekli sıcaklık -ATK0110 bulmaya çalışır ACPI BIOS’unda birden fazla kullanıcı mevcut olduğunda en iyi arayüz (lütfen, anakart modeliniz için destek koptuğunda rapor verin) — Fujitsu-Sieme için önceden hazırlanmış ön destek ns Hades
Değişiklikler
-Yüksek derecede iyileştirilmiş DELL desteği -nVidia I2C desteği tekrar 275+ -now ATI Radeon desteği ile çalışır. SpeedFan başlatıldığında Manuel Fan Kontrolü’nü sıfırladı (program çıkışında% 100’e daha fazla beklenmeyen video kartı fanı ayarlandı) Sunucular için Intel X79 (Patsburg) SMBus desteği. USB muhafazaları için SMBus destekli SAT desteği — SunPlus, IoData ve Logitech chipset’leri kullanan USB muhafazaları için verilen destek — çeşitli Intel anakartlar için ayarlanmış voltaj okuma ayarları ve yapılandırmaları — tam destek Fintek F71858AD için -Arrison Areca RAID desteği ve Areca SAS denetleyicileri için geliştirilmiş destek -sadece hafif bir şekilde yeniden yapılandırılmış sabit disk USB satıcısı tahmin etme-AMD Ailesi için uygun destek 12h (LLano) AMD Family 14h (Bobcat) sıcaklığı için destekli sıcaklık -ATK0110 bulmaya çalışır ACPI BIOS’unda birden fazla kullanıcı mevcut olduğunda en iyi arayüz (lütfen, anakart modeliniz için destek koptuğunda rapor verin) — Fujitsu-Sieme için önceden hazırlanmış ön destek ns Hades
Замените вентилятор
Иногда, что случается редко, вентилятор может не вращаться из-за собственной поломки. Понадобится проверить рабочее ли устройство. Это можно осуществить путем подачи на разъем напряжения от 5 до 12 Вольт. В такой ситуации подойдет батарейка «Крона» или четыре соединенных последовательно пальчиковых батарейки.
Отрицательный полюс батареи надо соединить с первым контактом разъема (черный провод), положительный же – со вторым контактом (желтый или красный провод). Если вентилятор при подключении к такой схеме не включится, то он может считаться физически сломанным. Необходимо купить новый.
ThinkPad laptops
Some fan control daemons include AUR and AUR (recommended).
Installation
Install AUR or AUR. Optionally, but recommended, install . Then have a look at the files:
# pacman -Ql thinkfan
Note that the thinkfan package installs , which contains
options thinkpad_acpi fan_control=1
So fan control is enabled by default.
Now, load the module:
# modprobe thinkpad_acpi
# cat /proc/acpi/ibm/fan
You should see that the fan level is «auto» by default, but you can echo a level command to the same file to control the fan speed manually:
# echo level 1 > /proc/acpi/ibm/fan
| Level | Effect |
|---|---|
| off | |
| 2 | low speed |
| 4 | medium speed |
| 7 | maximum speed |
| auto | default — automatic |
| full-speed | real maximum speed |
The thinkfan daemon will do this automatically.
«7» is not the same as «full-speed». «7» is the maximum regulated speed. full-speed is the maximum unregulated speed.
Finally, enable the .
To configure the temperature thresholds, you will need to copy the example configuration file () to , and modify to taste. This file specifies which sensors to read, and which interface to use to control the fan. Some systems have and available; on others, you will need to specify something like:
hwmon /sys/devices/virtual/thermal/thermal_zone0/temp
to use generic hwmon sensors instead of thinkpad-specific ones.
Running
You can test your configuration first by running thinkfan manually (as root):
# thinkfan -n
and see how it reacts to the load level of whatever other programs you have running.
When you have it configured correctly, start/enable .
Dell laptops
i8kutils is a daemon to configure fan speed according to CPU temperatures on some Dell Inspiron and Latitude laptops. It uses the interface provided by the driver (an alias for ). Results will vary depending on the exact model of laptop.
Installation
AUR is the main package to control fan speed. Additionally, you might want to install these:
- — must be installed to use i8kmon.
- — must be installed in order to run i8kmon as a background service (using the option).
- — must be installed together with to run as X11 desktop applet.
- AUR — recommended if your BIOS overrides fan control.
Configuration
The temperature points at which the fan changes speed can be adjusted in the same configuration file. Only three fans speeds are supported (high, low, and off). Look for a section similar to the following:
set config(0)  {{0 0}  -1  55  -1  55}
set config(1)  {{1 1}  45  75  45  75}
set config(2)  {{2 2}  65 128  65 128}
This example starts the fan at low speed when the CPU temperature reaches 55 °C, switching to high speed at 75 °C. The fan will switch back to low speed once the temperature drops to 65 °C, and turns off completely at 45 °C.
Tip: If when running with the verbose option you notice that the state changes (example of an output: ) but right and left fans report state 0, you might consider changing the speed value of the first state in the configuration file from default 1000 to 2000 or higher.
BIOS overriding fan control
Some newer laptops have BIOS fan control in place which will override the OS level fan control. To test if this the case, run with verbose mode in a command line, make sure the CPU is idle, then see if the fan is turned off or turned down accordingly.
If the BIOS fan control is in place, you can try using AUR:
Warning: Turning off BIOS fan control could result in damage to your hardware. Make sure you have i8kmon properly set up beforehand, or leave the CPU idle while you test this program.
To enable BIOS fan control:
# dell-bios-fan-control 1
To disable BIOS fan control:
# dell-bios-fan-control 0
BIOS fan control can be automatically disabled by starting/enabling .
GPU-Z

GPU-Z is yet another free fan speed monitor software for Windows. This software is specially designed to find specification and parameters of a graphics card. Using it, you can easily find out the fan speed of graphics cards of both Nvidia and AMD/ATI companies. Along with fan speed, you can monitor the GPU core clock, memory clock, temperature, GPU load, memory controller load, etc. GPU parameters. In it, you can also find out the full specification of your graphics card like texture fix rate, bus width, bandwidth, shaders, pixel rate, etc. In general, it is quite a good software to find out GPU fan speed, but its disability to monitor CPU fan speed is its one major drawback.
Using SpeedFan Safely
What is SpeedFan? Well, it’s a fan control software for Windows PC. You can change or control the CPU fan speed manually. Its added ability also lets you check CPU temperature on Windows.
This is a smart guardian for Windows that accurately reads S.M.A.R.T sensors and lets you change the CPU fan speed. This is how SpeedFan works and shows you correct information while giving you more control over your PC fans.
This utility is safe and free from any virus or malware. You can download this tool on Windows10 and Windows 7. Even Linux and Mac users can use this tool after making little changes.
Users can install SpeedFan’s latest version 4.52. This is a good tool that doesn’t let you install any additional toolbar. Its developers are providing continuous support, so you will receive updates if any bugs or error pops up.
If you need to Uninstall this tool due to any reason you can do so very easily. Just head towards the control panel and you will find this utility icon appearing on a list. Click on it to uninstall.

