Routerlogin.net setup support
Blocking Internet Sites using Netgear Genie App
We totally understand that not all websites available over World Wide Web are helpful for your family members. Netgear Genie App can easily allow you to manage all possible configurations for your Netgear routers. Also, Netgear genie application you can block the websites you do not want to allow for your home network. You will receive complete information regarding the topics that relates with www.routerlogin.net login, www.routerlogin.net admin, www routerlogin.net, routerlogin.net 192.168.0.1, Netgear router sign in, log into Netgear router, arlo.netgear.com and routerlogin net start.
Here are the Steps you Will Need to Follow
- First you will need to open the web browser at your computer system.
- In the address bar of your web browser you will need to fill Netgear router login address. Default address for Netgear router login is routerlogin.net or you can also use 192.168.0.1 IP address.
- You will ask to fill the login details for your Netgear Wifi router. make sure to fill the correct login details for your Netgear router login.
- After making login access for your Netgear Genie App you will need to go for “Advanced” option.
- After that select “Security”.
- Then go for “Block Site” tab.
- There you will get sub options for blocking the websites you do not want to allow for your home network.
- You can choose “Pre Schedule” option for blocking the websites or you can also go for “Always” option. If you choose the “Always” option that means you will never access the blocked websites.
- At last, do not forget to click on the “Apply” button.
These are the steps for blocking websites using Netgear Genie Application. If you need more details regarding routerlogin net start, www routerlogin net setup, 192.168.1 Netgear router setup, log into Netgear router, Netgear router sign in, routerlogin.net 192.168.0.1 and www routerlogin.net then you can visit to our blog page.
7,629 total views, 0 views today
Is There Any Difference Between Reset and Restore of Router Devices?
Both restore and reset settings are totally different. When you need to delete all settings and all configurations from your Netgear wifi router device then you can reset your device to default settings. When you press the reset button from the backside of Netgear device, all configurations will be deleted for your Netgear device.
On other hand, power cycle process is used when you start getting speed issues with your router device. When you find that internet connections are slow at your Netgear, you can power cycle your Netgear wifi router and modem device.

If power cycle is not working and your wifi speed is still slow then you can contact internet service providers for help. If your wifi is slow from back side then power cycle process will also not help you.
Router Default IP not Working?
If the Netgear router default IP address https://192.168.1.1 is not working, then first you must know that broadband routers have two IP addresses – Private IP or Local IP and the Public IP address. The Private IP address is used to communicate locally within the network, and the Public IP is used for connecting to the Internet.

The local IP address of your router becomes the default IP address if you have never changed it in the past. A router’s default IP address is the address with which you can access the router settings.
This IP address serves you as the URL of the router login portal. However, you will need specific credentials when you log in to your router using this default IP address. These needed credentials are provided in the user guide of your router.
So in a nutshell, any typing errors with the IP address or credentials lead to IP address not working. Also, without any doubt, most of the Netgear routers have this common IP – 192.168.1.1. But few also have routerlogin.net or 192.168.1.0. You can take reference from the router IP list, as per your model.
Still Router IP Not Working? Try Ping 192.168.1.1
Netgear router IP not working issue can also occur due to poor or improper internet connectivity. So, you are suggested to execute ping 192.168.1.1 test for checking the connectivity of your network. For running the ping 192.168.1.1 command, all you need to do is:
- Launch the Command prompt to get started with the ping 192.168.1.1 test.
- Locate the Windows icon and type ‘cmd’ in the search bar.
- As soon as you press the Enter key, the Command Prompt will show on your computer’s screen.
- Thereafter, type ping 192.168.1.1 in the space given and hit Enter.
- A list of various responses will appear on your screen. By going through all these responses, you will be able to check whether you are getting proper WiFi connectivity or not.
That’s how you can run the ping 192.168.1.1 test on your system and check whether your Netgear router login IP is not working due to network connectivity issue or something else is there creating the issue. If you find any trouble while running the ping 192.168.1.1 command on your system, feel free to get in touch with our professionals for instant help and make your Netgear router IP working.
Обновление за июнь 2021 г .:
Теперь мы рекомендуем использовать этот инструмент для вашей ошибки. Кроме того, этот инструмент исправляет распространенные компьютерные ошибки, защищает вас от потери файлов, вредоносных программ, сбоев оборудования и оптимизирует ваш компьютер для максимальной производительности. Вы можете быстро исправить проблемы с вашим ПК и предотвратить появление других программ с этим программным обеспечением:
- Шаг 1: Скачать PC Repair & Optimizer Tool (Windows 10, 8, 7, XP, Vista — Microsoft Gold Certified).
- Шаг 2: Нажмите «Начать сканирование”, Чтобы найти проблемы реестра Windows, которые могут вызывать проблемы с ПК.
- Шаг 3: Нажмите «Починить все», Чтобы исправить все проблемы.
Проблема с маршрутизатором может быть связана с временной ошибкой программного обеспечения / связи. Это очень распространенный сценарий, который может происходить время от времени. Проблему можно решить, выключив, а затем снова включив маршрутизатор и вашу систему.
- Выключите маршрутизатор, а затем вашу систему.
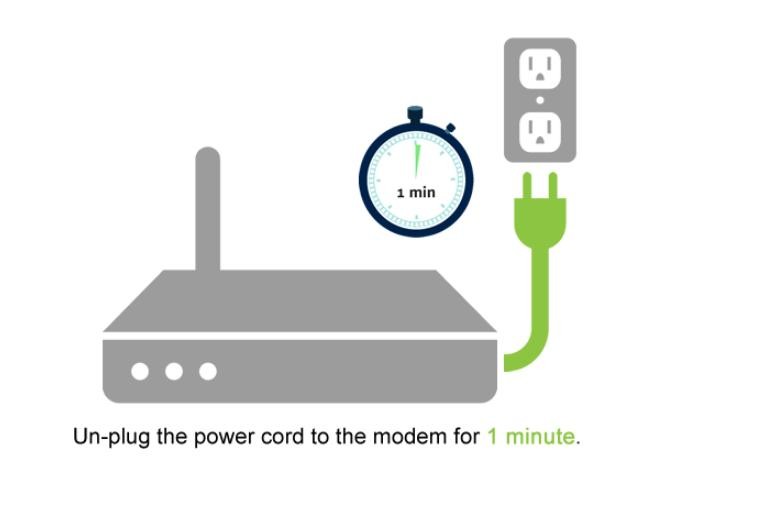
- Теперь отключите шнур питания от роутера.
- Подождите не менее 30 секунд, затем снова подключите шнур питания к маршрутизатору.
- Теперь включите вашу систему и подождите, пока она полностью не включится.
- Затем включите маршрутизатор и посмотрите, сможете ли вы получить доступ к Routerlogin.net.
Настройка роутера Netgear: для старых прошивок
Старые прошивки отличаются от новых только названиями разделов — все пункты параметров в блоках остаются прежними, поэтому рассмотрим только, как попасть в те или иные блоки с настройками.
Выбор типа подключения и привязка по адресу MAC
В левом меню нам нужен первый главный раздел «Настройка», а в нём — блок «Основные настройки».

Теперь настройте свой тип подключения, используя одну из инструкций выше (статический или динамический IP, PPPoE, L2TP, PPTP). После изменения всех параметров нажмите на кнопку «Применить» (она уже будет находиться внизу).

Выберите тип подключения и укажите все необходимые данные из договора

При настройке «Вай-Фая» главное указать пароль для точки доступа
Настройка IPTV
Для настройки цифрового ТВ переключитесь на блок разделов «Дополнительно» — откройте вкладку «Параметры интернет-порта». Все настройки — такие же как и в случае с новой прошивкой Netgear — используйте инструкцию выше.

Укажите порт для приставки — отметьте его галочкой
Сервер DHCP и «локалка»
В том же последнем блоке разделов «Дополнительно» щёлкните по пункту «Параметры локальной сети» — попадёте в настройки «локалки». Измените при необходимости параметры, используя соответствующую инструкцию выше.

Настройте при необходимости диапазон IP-адресов и изменить локальный адрес роутера
Вход в интерфейс
После подключения и настройки оборудования можно переходить к разрешению вопроса, как зайти на роутер. Практически на всех маршрутизаторах адрес интерфейса, логин и пароль указаны на этикетке, которая расположена на нижней части устройства.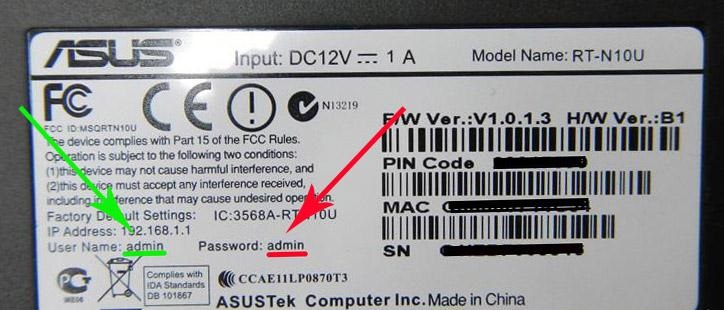
Если наклейки нет, то посмотреть адрес для отображения в браузере веб интерфейса роутера можно с помощью программных средств:
- Откройте «Центр управления сетями».
- Перейдите к изменению параметров адаптера.
- Дважды щелкните по значку подключения по локальной сети.
- Нажмите «Сведения» и посмотрите значение «Шлюз по умолчанию».
Если вы самостоятельно меняли логин и пароль, но не можете вспомнить новые значения, то воспользуйтесь кнопкой Reset на роутере, чтобы сбросить его настройки до заводских параметров. После сброса параметров идентификационные данные станут стандартными – admin/admin.
Смотреть адрес маршрутизатора необязательно. Большинство производителей используют одинаковый адрес, поэтому порядок запуска интерфейса маршрутизаторов разных моделей не сильно отличается.
Например, роутеры TP-Link и D-Link используют IP-адрес 192.168.0.1. После ввода этого значения в адресной строке браузера появляется окно авторизации — в нем нужно прописать логин и пароль. Для некоторых моделей маршрутизаторов D-Link Dir нужно указывать только логин, строку для пароля можно оставить пустой.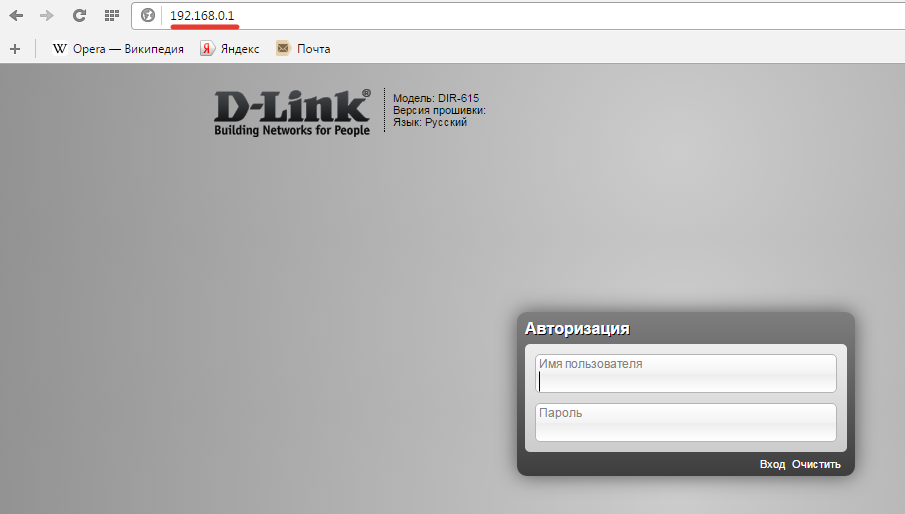
У роутеров Asus и Netgear установлен по умолчанию адрес 192.168.1.1. Логин и пароль тоже обычно стандартные – admin/admin. Но могут быть варианты: например, у маршрутизатора NETGEAR WGR614 логином будет «admin», а паролем – «password».
У маршрутизаторов Huawei данные для входа немного отличаются от привычных значений. Адрес для входа в интерфейс – 192.168.100.1. Логин и пароль тоже не совсем стандартные – root и admin соответственно. На некоторых моделях установлены еще более сложные пары для авторизации.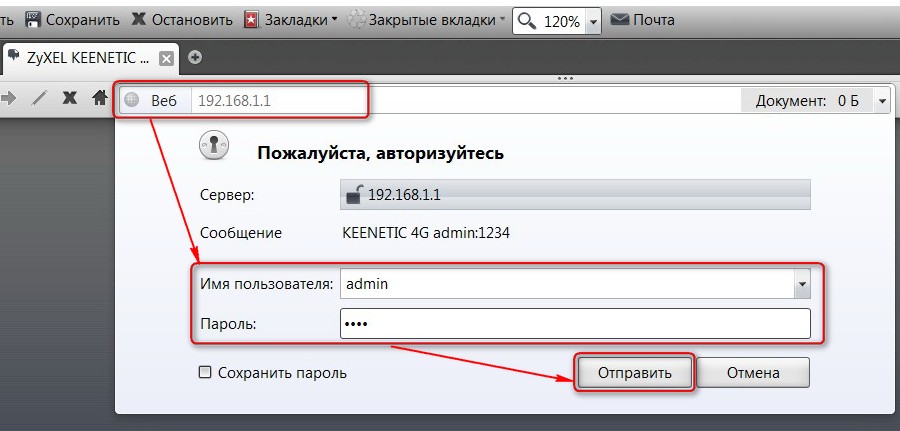
Маршрутизаторы Zyxel Keenetic имеют легко запоминающийся адрес my.keenetic.net. В качестве альтернативы используется стандартный адрес 192.168.1.1. Логином будет слово «admin», а пароль при стандартных настройках – 1234.
Кажется, можно запутаться, но на самом деле всё просто. В 90% случаев адрес будет 192.168.0.1. или 192.168.1.1, а парой для авторизации – admin/admin. Если эти значения не позволяют открыть веб-интерфейс, то внимательно прочтите инструкцию – там всегда указаны адрес, логин и пароль.
Возможные ошибки входа
Если зайти в настройки роутера с помощью автоматических настроек не получается, то попробуйте установить параметры входа вручную, используя IP-адрес маршрутизатора.
- Нажмите сочетание клавиш Win+R и выполните запрос «cmd» для вызова командной строки (или воспользуйтесь встроенным поиском в меню «Пуск»).
- Введите в окне интерпретатора команду «ipconfig».
- Найдите «Основной шлюз» – это и есть IP-адрес роутера. Эти же сведения можно посмотреть другим способом, нажав в свойствах подключения на кнопку «Сведения».
Зная IP-адрес маршрутизатора, можно вручную указать параметры протокола TCP/IPv4:
- Откройте свойства подключения.
- Перейдите в свойства протокола.
- Установите чекбоксы «Использовать следующий» и введите вручную нужные значения.
Чтобы понять, какие значения нужно указывать, возьмем IP-адрес роутера – например, 192.168.0.1. Исходя из этого адреса, заполните строки следующим образом:
- IP-адрес – 192.168.0.2 (последняя цифра должна быть в диапазоне от 2 до 254).
- Маска подсети – 255.255.255.0 (всегда остается неизменной).
- Основной шлюз – 192.168.0.1 (здесь указан адрес роутера).
- Предпочитаемый DNS – 192.168.0.1 (тоже прописывается адрес роутера).
При таких настройках проблема запуска веб-интерфейса маршрутизатора через браузер должна быть решена. Дальше вам останется только настроить интернет и создать беспроводное подключение, чтобы Wi-Fi роутер начал выполнять свои функции по обеспечению постоянного доступа в сеть с разных устройств.
How Routerlogin.net is useful for Netgear routers?
Often customers forget the address of their routers. In the case when you want to change your router’s settings or do some admin work, you need to first log in to your broadband router. In order to log in to your router, there is a requirement for the internal IP address. But in the case when you forget or don’t know the IP address of your router, these links, www.routerlogin.com and www.routerlogin.net will help you. You can configure most of the Netgear home routers with these links. So when you use any of these links inside a home network, your Netgear router will recognize it and will take you to the home screen for your router.
Настройка маршрутизатора Netgear
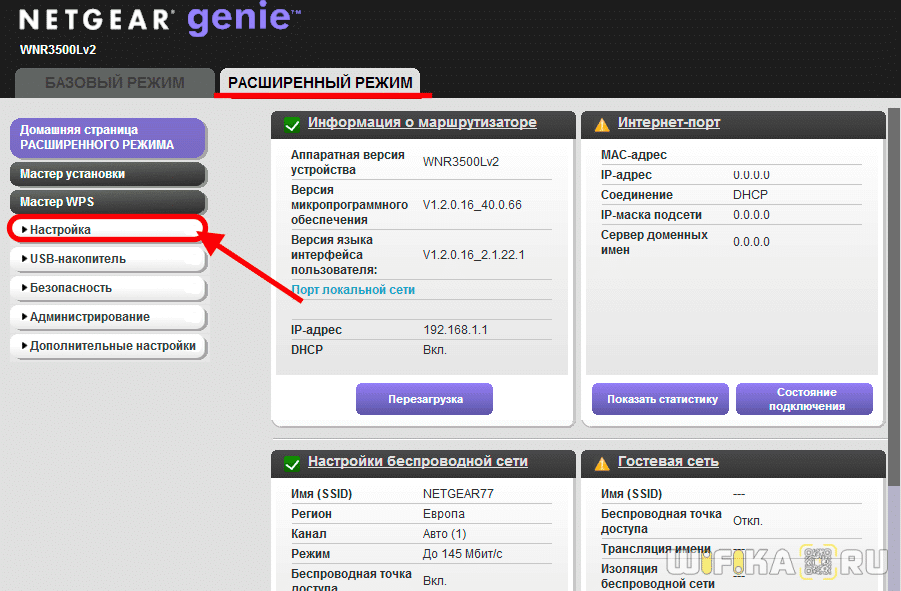
Попадаем в панель администратора Netgear. Как видим, под значком «Интернет» красный цвет, который означает, что в данный момент подключение не активно. Можно воспользоваться функцией быстрой настройки роутера, но чтобы контролировать весь процесс подключения, рекомендую сразу перейти в «Расширенный режим»

На главной странице личного кабинета отображается сгруппированная по тематическим блокам сводная информация о текущем состоянии локальной сети. Нас же интересует раздел «Настройки» в основном меню навигации.
Подключение к Интернету
Внутри есть также несколько подразделов. Первым из них идет «Настройка Интернета» на маршрутизаторе Netgear. Здесь необходимо знать какой у вас тип подключения, который указывается в договоре с провайдером. Если там его вы найти не можете, то позвоните в поддержку и узнайте.
- Для Статического или Динамического IP ставим флажок на «НЕТ» в параметре «Требуется ли при подключении к Интернету ввести имя пользователя и пароль?»
- Если же у вас PPPoE, PPTP или L2TP, то выбираем «ДА» и в выпадающем списке «Тип подключения» выбираем свой.
Далее указываем эти логин и пароль для коннекта, а также при необходимости вписываем «Адрес сервера». В «Режиме подключения» ставим на «Всегда подключено», что интернет работал постоянно. Остальное в большинстве случаев оставляем на «Автомат», если иное не указал ваш провайдер.
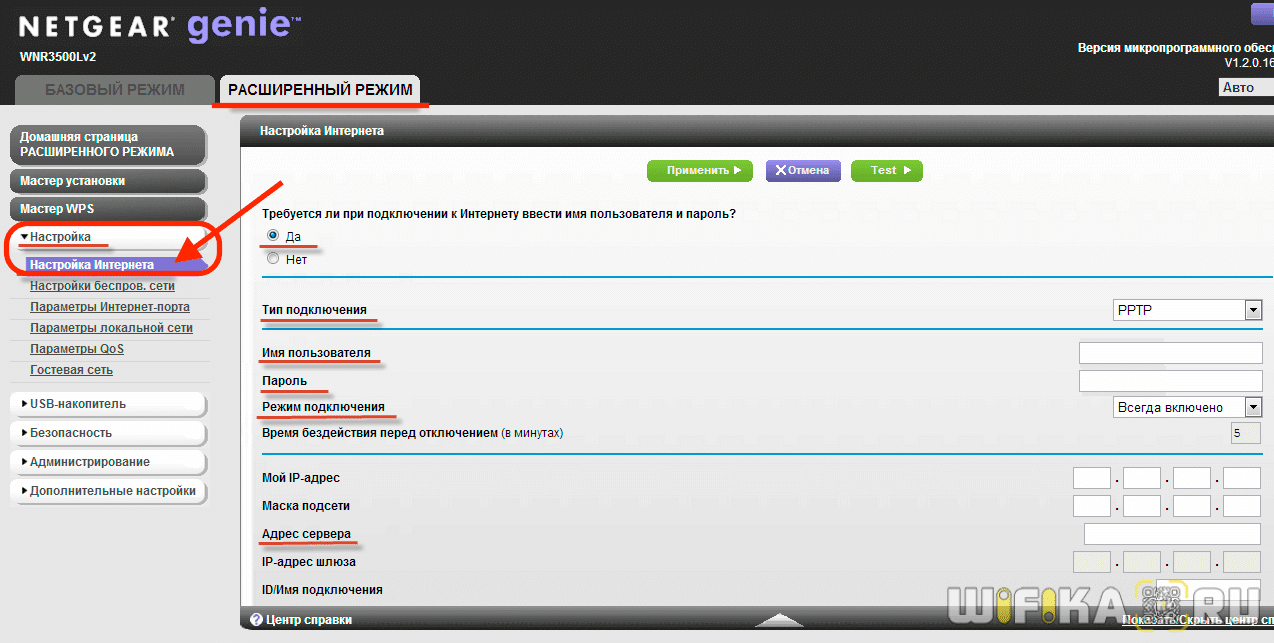
Сохраняем все изменения кнопкой «Применить» вверху страницы.
Ваше мнение — WiFi вреден?
Да
22.97%
Нет
77.03%
Проголосовало: 30830
Настройка сети WiFi
И переходим в следующее меню роутера Netgear — «Настройка беспроводной сети».
- Здесь сразу ставим галочку на «Включить широковещание SSID», чтобы имя вашего сигнала было видно для всех устройств. Иначе сеть будет невидимой и могут возникнуть сложности с подключением к ней.
- Далее придумываем название и пишем его в поле «Имя»
- Регион и канал оставляем по умолчанию, а вот в качестве режима выбираем 300 мбит/c для самой высокой скорости, которую поддерживает данный роутер Netgear.
- В параметрах безопасности ставим «WPA2/PSK» — самый защищенный протокол шифрования данных на сегодняшний день.
- В качестве «Фразы-пароля» указываем набор латинских букв и цифр, не менее 8 символов.
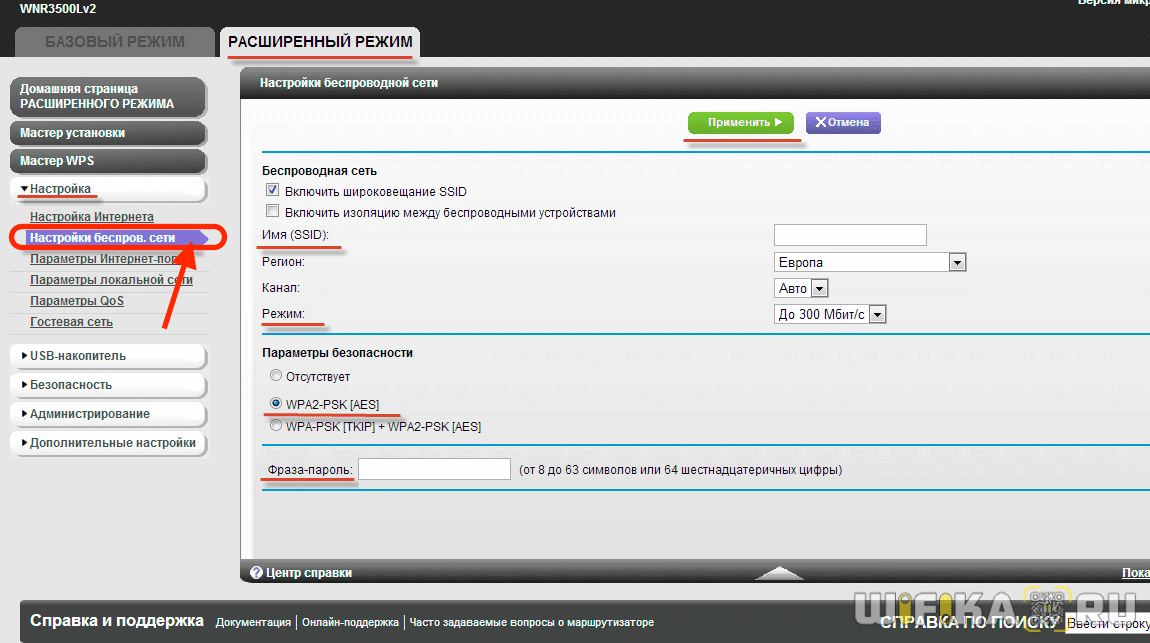
И снова сохраняемся. Вот и все настройки, как видите, это было совсем несложно.
Basic Troubleshooting steps:
You need to keep in mind that you do not hurry to reset your Netgear wireless router for fixing your problems. First try following the steps below and keep the reset option as the last to proceed. A simple reboot or power cycle helps solving the connectivity issues mostly.
- Start with restarting your internet modem and your router. Plug out the power cable from the router and the modem as well and wait for about 10 seconds before plugging it back. Do not forget to restart your computer.
- Wait for a minute to let the internet LED light on your modem and your router. The light indicates that the modem is working fine and it is receiving internet from your ISP.
- Also check if the internet LED on the router is lit, if yes, try to use the internet and check if the router is working after the restart process or not.
You can then further test he Internet Service Provider Connection and your modem
- Make a connection between your computer and your modem by using an Ethernet cable connection. Locate the cable connecting modem to the internet port of your router, disconnect it and plug it into your computer or laptop.
- Switch off your wireless router and then restart your computer as well as modem after making a connection through a cable.
- Now, after your computer restarts, you need to try using the internet with your computer, if it works, that means the modem, computer as well as the Ethernet cable are working fine. If not, you can contact your ISP.
You can then try to fix your Netgear Wireless Router.
Netgear Router reset:
Try following the Soft reset steps firstly:
- Establish a connection between your computer and your Netgear wireless router.
- Login to your Netgear Router Setup console through www.routerlogin.net or www.routerlogin.com , or you can try to login through IP 192.168.0.1 or 192.168.1.1
- Enter your default username- admin & Password- password as login details
- Once you enter the admin page of the router, go to the Backup setting.
- You will see an option for Revert to Factory Default settings.
- Click on Erase under that option and this is followed by your Netgear router resetting all your settings to factory default.
- It might then ask for reboot. You then need to restart your Netgear Router & your Modem too and then try setting up the router once again.
Router Reset
This is a very important topic as it helps to solve many problems related to your router. This is a simple one to get rid of any problem. Just reset it but do remember if you do so all the saved settings will be gone. This is the only disadvantage that you have to change the settings again. To reset the router, find the reset button on the back of your router.
This is a small button to prevent accidental resets. Take a paper clip and hold that button for 20-30 seconds and then release it. Wait for the light to be green or white. Now you have the router with all default settings. You have to log into your router and change the password and other settings you need.
There are various modems of routers we provide help of. We are just one click away to solve your problems. The modems and routers include are:
- AC3200 X4
- N750 WIFI DSL Modem router
- Broadband high speed DSL modem
- AX11000 Tri band Stream WIFI 6 router And various other models.
Hard reset Netgear router steps:
- Press and hold the Restore Factory Settingsor Reset button located on the back of your router for about 10 seconds.
- Keep holding the reset key until you see all the lights start to blink.
- Release the Restore Factory Settingsor Reset button after 10 seconds and wait till your router reboots.
- When the factory reset is complete, the Power LED light stops blinking and lights to solid green.Note: The Power light on recent Netgear router models becomes solid white.
Finally, the factory default settings are restored.
Update your Netgear Router Firmware steps:
It’s possible that the firmware for your Netgear router has been outdated and you forgot to perform maintenance or upgrade your software on the wireless router.
- Login through your web browser by entering http://www.routerlogin.net from your device which is connected to the network.Note: it is recommended to use an Ethernet cable to connect your computer to your router for upgrading the firmware.
- Enter your Default user name and your password; admin & password.
- Go to the router settings, Click on ADVANCED > Administration.
- Then select and click Firmware Update or Router Update.
- Click on Check, This asks the router to search for new firmware information. If any update is available, it then displays a message enquiring if you want to download and install it.
- Click on Yes button and the router downloads the firmware and begins the new update.
- After the completion of the upload, your router will restart and your router firmware has been finally updated.
В чем суть?
Роутер (далее так будем называть все устройства, на которые нужно зайти) – это обычное сетевое устройство. А в сети у всех есть свой отдельный IP адрес. Для тех, кто не разбирается в технологиях, IP адрес – это 4 цифры, разделенный точкой. По ним все устройства и находят друг друга, от вашего роутера, до посиделок на серверах ВКонтакте да любимого Ютуба.
Для простоты роутеры обычно снабжают по умолчанию простым IP адресом. 192.168.1.1 – как раз указывает на первый адрес в сети 192.168.1.*. Так проще запомнить, так легче понять структуру. Иногда на производстве все переделывают, но дома на устройствах с базовыми настройками это в половине случаев так.
How to set up a new Netgear router?
Basically, there are two methods to set up a Netgear router setup for the first time:
- Setup a new Netgear router using the router web interface
- Setup a new Netgear router using the Nighthawk app
Netgear router setup using Routerlogin.net:
Given below are the steps to install the new Netgear router using the web interface:
- Connect your router with Power. First, find the power cable and connect your Netgear router with a power source.
- Connect the Netgear router to the modem by a cable. There is a need to connect the router with a modem in order to provide the local network with the Internet.
- First, get an Ethernet cable.
- Insert one end of the Ethernet cable into the Internet port/ WAN port available on the rear side of the router.
- Now plug in another end of the cable into the Yellow port (Ethernet/ LAN port) available on the rear side of the modem. This way you can connect your router with a wired network connection.
Open a browser on the PC or laptop that is connected to the Netgear router. In the browser, navigate to www.routerlogin.net Fill in the username and password. The default username for most of the Netgear routers is admin and the default password is password.
Now
- Now go to ADVANCED > Setup Wizard
- Choose the Yes radio option and hit Next. This way your router will detect your internet connection. You will be prompted to log in.
- Now type in your new admin password and confirm it.
- After this, you will be asked to choose any of the two security questions and their answers.
- Hit Next.
- You will see the Congratulation page.
- Again hit the Next button. This will display the Firmware Update Assistant screen.
- In the case when no Firmware update is available, simply hit OK. Your router is installed.
- When there is any Firmware update available, hit the yes button to update your firmware.
- After the update, your router will reboot and will again ask to log in.
- This time fill in the password that you have created.
The router is set up.
Can’t Access Netgear Router Login Page? Try These Steps
Accessing the router login page is possible using routerlogin.net web address or you can also use 192.168.1.1 Netgear IP address for router login but, majority of Netgear router users face issues with accessing Netgear router login page. If you are also getting such kind of login issues then you can try the tips we are explaining in following session.
- First you have to make sure that the Ethernet connections you have configured are correct. You will need to connect your Netgear router, computer system and WiFi modem together using the Ethernet cable. You will receive a complete manual for setting up these simple connections.
- If you are getting issues with Netgear router login page then you will need to make sure that your modem is receiving the internet connections accurately. If your modem is not receiving the Wifi signals then you should contact your internet service provider for help.
- Make sure that you are putting Netgear router login address in the web browser address bar not in the search bar.
Netgear WNR2500 WiFi router is very famous and thousands of users are using this advance router for their business needs. If you are also using Netgear WNR2500 router then you will need to make sure that you are making all required configurations for your router using routerlogin.net web address. There we are going to explain the steps you will need to follow so that you can configure your WiFi router for the internet connections.
Here are the Steps you will Need to Follow
First, you will need to connect your Netgear WNR2500 router with the network modem. You can create these connections using Ethernet cable.
- After that you will need to connect your computer system with the Netgear WNR2500 router. this connection will also configured using the Ethernet cable
- Now, you can provide power supply to all your devices including your Netgear WNR2500 WiFi router, computer system and network modem.
- Access Netgear router login page using www.routerlogin.net web address. you can also use 192.168.1.1 IP address for accessing Netgear router login page.
- You will get new window where you will need to fill the login user name and password for your Netgear router login page.
- After making login access for Netgear router setup page go for “Advance” option.
Select “Setup Wizard” option after that.
Click on “Next” option after selecting the “Yes” button.
You will receive a new window that the internet connections are configured for your Netgear router.
These are the simple steps you will need to follow so that you can easily manage the internet connections for your Netgear WNR2500 WiFi router. From the web pages you will receive more detailed information regarding http //www.routerlogin.net, www.routerlogin.net login, www.routerlogin.net admin, www routerlogin.net, Netgear router sign in, log into Netgear router, 192.168.1 Netgear router setup and routerlogin net start.
How to Find Default Login IP Address for Netgear Router?
Netgear wifi router devices share a common IP address that is used so that you can access Netgear login page from a computer device. We are talking about http:// 192.168.0.1 IP address because this is the common IP address that used for most of the Netgear wifi routers, modem devices and even for Netgear wifi extender devices.
If you find that your Netgear device is not using this default login IP address then you can easily find the Netgear login IP address using following simple steps.
- Connect Netgear wifi router with a computer and then open web browser to your computer.
- Fill http:// routerlogin.net address to your web browser.
- After typing login user name and password in the login page click on “Advanced” button.
There you will find the default login IP address that your Netgear router is using. This is the IP address that you can use later every time when you need to change your router settings.
How to Change Nighthawk Router Name
Each wifi router device that you install at your home will have a default name and you can change this default name easily from your Netgear router setup page. You can change the default name of your Netgear nighthawk and get a new name of your device.
Steps to Change Default Name of Nighthawk Router Name
- Connect your Netgear wifi router and your computer device together using Ethernet cable. If you do not want to use Ethernet cable then you can connect your device over wireless connections.
- Open command prompt at your computer device.
- Type “cmd” and click on “Enter” button.
- There you will find IP address and default gateway details.
- Open web browser and fill http:// routerlogin.net address in the address bar.
- Tyr Netgear login user name and password. Default user name and “admin” and default password is “password”.
- Click on “Setup” button.
- Change the device name from there and click on “Save” button.
These are the steps to change the device name of your Netgear nighthawk devices.
Netgear Router Login Blog
Yesterday I went to my aunt’s house to fix her Internet. From the past few days, she was complaining about her Internet, not working. Well, I had my day off yesterday, so I thought I should go and fix the Internet. My aunt lives alone after my uncle passed away last year. I gave her a surprise visit, and she was delighted not because I was there because her Internet was about to get fixed. “I called you a thousand times this damn thing doesn’t work, and the Internet company guy says there is a problem with my router which you gave me last Christmas, now fix this or get me a new one.”
After my uncle’s death last year, my aunt went through a lot. To distract her, my cousin Vicky( her Daughter) sent her a laptop. That kept her busy in her cooking lessons and fact-checking. I was assigned the work to get her a highspeed Internet as I was working as a network engineer for Kia. So in this post today, Iam giving the essential DIY tips to troubleshoot the home router.

router login failure
Netgear firmware upgrade
How to upgrade the firmware of the Netgear router???
- It is the update that provides you with the new features and enhances the security of a product
- There is a simple and smooth way to upgrade your firmware router by connecting with the Nighthawk app.
If you want to upgrade your router firmware, you should follow these instructions:
- First of all, connect your computer to the router by using an internet cable.
- Go to the Netgear website and visit Netgear support
- Next, you should enter your device or product model number
- Then go for downloads
- Now select the version of firmware that you want to download
- Enter routerlogin.net
- Enter router username and password
- Select firmware update or Router update.
Manufacturers often suggest that you should often ignore such kinds of updates unless you face any kind of problem with its working but the advantage of doing so is to maintain the stabilization of your device.
In order to get any kind of new information, routerlogin.net is available.
Here are some of the new versions of Netgear firmware:
Router Firmware
C6250. V1.02.02
C6300. V3.01.12
C6300v2. V1.03.06
C6900. V1.01.35
When you face any problem while your Netgear firmware is not connecting to the internet Enter Routerlogin.net, update your wireless router to the latest firmware version.Reset your Netgear router and reset your wifi router for your connection to be back to you and work properly. The update takes little time usually 5- 10 mins. When the update is completed try to read and be aware of new features and versions.If you are on your mobile device, download the Nighthawk app and If you want to sign in or log in, type Routerlogin.net. Tap the image of your router and scroll down for new updates, if there is something new available then go for an update.
F.A.Qs
How do I log in to the NetGear router?
1. Open any of your preferred web browsers on your computer or mobile device. Make sure that the device you’re using is connected to your router’s network.2. Type in http://www.routerlogin.net or http://www.routerlogin.com on your web browser’s address bar.3. You may also type in the default IP address on the web browser’s address bar.4. Press Enter or click Search.5. You might get a notification from your browser saying that the connection is not secure. Verify if the web address you typed in is correct and proceed to the router login window.6. Enter your admin username and password in the router login window. If this is your first time logging in or hasn’t changed the login details, use the default. The default username is admin. The default password is “password.”7. Click or tap OK or Log In.8. After successfully logging in, you’ll be taken to the BASIC Home screen.
How to change the NetGear router login password?
1. Open a web browser on your computer or mobile device. Make sure that the device you’re using is connected to your router’s network.2. Type in http://www.routerlogin.net or http://www.routerlogin.com on your web browser’s address bar.3. Enter the router username and password when prompted.4. If it’s your first time accessing your router or hasn’t changed the login details, use the default. The default username is admin. The default password is password. Login details will not work anymore once you’ve changed them.5. Click OK.6. This will take you to the BASIC Home page.7. Select Wireless.8. Enter your new network name in the Name (SSID) field.9. Enter your new password in the Password (Network Key) fields.10. Click the Apply button. Your changes will then be saved.
How to change NetGear router admin login?
1. Open a web browser on your computer or mobile device. Make sure that the device you’re using is connected to your router’s network.2. Type in http://www.routerlogin.net or http://www.routerlogin.com on your web browser’s address bar.3. Enter the router username and password when prompted.4. If it’s your first time accessing your router or hasn’t changed the login details, use the default. The default username is admin. The default password is password. Login credentials will not work anymore once you’ve changed them.5. Click OK.6. This will take you to the BASIC Home page.7. Select Wireless.8. Enter your new network name in the Name (SSID) field.9. Enter your new password in the Password (Network Key) fields.10. Click the Apply button. Your changes will then be saved.
Conclusion
Accessing your router doesn’t require much technical background as long as you follow the step guide above. Should you have other issues with your NetGear Nighthawk router, or if the methods above were ineffective, contact Netgear Nighthawk for your queries. You can also check the details of other routers in the Router Login List.
Do you have questions, comments or want to share your experiences with your Netgear Nighthawk router login? Leave them in the comment section below, and we will get back to them as soon as possible!
Forgot Netgear Router Login Password?
Worry not! You can recover the forgotten routerlogin.net password without any problem. Netgear router password recovery enables you to recover your admin login password if changed or forgotten. It is recommended to enable router password recovery whenever you change your router’s admin password.
In order to recover the forgotten www.routerlogin.net admin password, here are the steps to consider:
- Plug in your WiFi router to an electrical source.
- Launch an internet browser of your choice on a PC or laptop.
- In the address bar, type www.routerlogin.com or www.routerlogin.net.
- Press the Enter key.
- The routerlogin net login window appears.
- Click on the Cancel button.
- Now, you will be landed on the Router Password Recovery window. Hit Continue.
- Select the security questions and answer them correctly.
- Click on the Continue button.

How to set up a new Netgear router?
Basically, there are two methods to set up a Netgear router setup for the first time:
- Setup a new Netgear router using the router web interface
- Setup a new Netgear router using the Nighthawk app
Netgear router setup using Routerlogin.net:
Given below are the steps to install the new Netgear router using the web interface:
- Connect your router with Power. First, find the power cable and connect your Netgear router with a power source.
- Connect the Netgear router to the modem by a cable. There is a need to connect the router with a modem in order to provide the local network with the Internet.
- First, get an Ethernet cable.
- Insert one end of the Ethernet cable into the Internet port/ WAN port available on the rear side of the router.
- Now plug in another end of the cable into the Yellow port (Ethernet/ LAN port) available on the rear side of the modem. This way you can connect your router with a wired network connection.
Open a browser on the PC or laptop that is connected to the Netgear router. In the browser, navigate to www.routerlogin.net Fill in the username and password. The default username for most of the Netgear routers is admin and the default password is password.
Now
- Now go to ADVANCED > Setup Wizard
- Choose the Yes radio option and hit Next. This way your router will detect your internet connection. You will be prompted to log in.
- Now type in your new admin password and confirm it.
- After this, you will be asked to choose any of the two security questions and their answers.
- Hit Next.
- You will see the Congratulation page.
- Again hit the Next button. This will display the Firmware Update Assistant screen.
- In the case when no Firmware update is available, simply hit OK. Your router is installed.
- When there is any Firmware update available, hit the yes button to update your firmware.
- After the update, your router will reboot and will again ask to log in.
- This time fill in the password that you have created.
The router is set up.
