Установка и настройка ntp-клиента в linux
Установка NTP-сервера на Ubuntu 18.04
Все действия, которые необходимо совершить для достижения цели — то есть, для установки NTP-сервера и синхронизации времени — будут описаны пошагово. Повторять их следует в такой же последовательности, ничего не упуская.
Шаг 1: Обновление списка репозиториев
Сначала рассмотрим как установить NTP сервер Ubuntu 18.04. Но установку любого ПО в Ubuntu предваряет выполнение следующей команды:

Она необходима для того, чтобы ОС обновила список репозиториев и имела актуальный перечень программных файлов, установленных на жестком диске.
Шаг 2: Установка NTP-сервера
Когда компьютер закончит выполнение предыдущей команды, самое время дать ему следующее задание. Оно заключается в установке протокола NTP на Ubuntu 18.04 c длительным сроком поддержки. Команда выглядит так:

После ее получения система проверит, доступны ли ей установочные файлы и сообщит о том, какой объем памяти будет занимать программа. На экране появится запрос на инсталляцию, который нужно подтвердить, нажав клавиши Y и ENTER, либо отклонить нажатием N и Enter (в том случае, если вы решили отложить все это дело на потом).
После завершения не помешает убедиться в том, что установка прошла успешно. Сделать это можно, спросив систему, какая именно версия NTP доступна на компьютере в данный момент:
sntp — version
Шаг 3: Настройка пулов NTP-сервера
Работа NTP-сервера по умолчанию строится на четырех «родных» пулах для Ubuntu. Их адреса прописаны в файле конфигурации /etc/ntp.conf . Нет прямой необходимости что-либо здесь менять, однако, есть смысл заменить пулы на те, которые расположены ближе к физическому месту нахождения сервера.

Чтобы переписать адреса пулов, нужно открыть упомянутый файл конфигурации в текстовом редакторе. Для этого служит следующая команда:

Список пулов удобнее всего скопировать со страницы сайта и вставить в файл вместо тех, что были там раньше:
Затем придется сохранить файл и закрыть его. Однако, сами по себе изменения в силу не вступят — чтобы сервер синхронизировался с новыми пулами, следует перезапустить службу NTP, а затем проверить ее статус. Делают это при помощи двух команд:

Если брандмауэр UWF активен, компьютеры-клиенты не смогут получать информацию с нашего сервера. Чтобы предоставить им доступ, нужно разрешить ему работу со службой NTP, выполнив одну из указанных команд:

С новыми настройками брандмауэр заработает только после перезагрузки:
Проверить, все ли сделано правильно, можно с помощью такой команды:
Если на вашем экране появилось то же самое, что вы видите на скриншоте, значит, установка и настройка NTP-сервера оказалась успешной. Теперь можно перейти к аналогичным действиям на машине-клиенте.
Настройка сервера ntp в CentOS 7
Сервер времени ntp использует в своей работе одноименный протокол — Network Time Protocol, которому для работы необходим UDP порт 123. Так что перед установкой и настройкой службы времени убедитесь, что на фаерволе открыт этот порт.
Устанавливаем сервер ntp:
Теперь отредактируем файл конфигурации /etc/ntp.conf , удалив все лишнее:
| Параметр | Описание |
| server | Список серверов для синхронизации времени |
| driftfile | Задает адрес файла, в котором хранится история изменений времени во время синхронизации. Если по каким-то причинам синхронизация времени с внешними источниками станет невозможна, служба времени изменит системные часы в соответствии с записями в этом файле. |
| restrict 127.0.0.1 |
Указывает, что пользоваться нашим сервером времени можно только непосредственно с локального интерфейса. Если вам необходимо разрешить другим компьютерам в вашей локальной сети синхронизировать время с текущей машины, то укажите в данном параметре адрес вашей сети, например: restrict 192.168.10.0 mask 255.255.255.0 |
| restrict default nomodify notrap nopeer noquery | Параметры указывают на то, что клиентам данного сервиса времени запрещено изменять его настройки, получать его статус. Они могут только забрать с него значения точного времени. |
| disable monitor | Данный параметр повышает безопасность, предотвращая использования одной из уязвимостей сервиса ntpd, которую можно использовать для проведения DDoS атак. |
| logfile | Указывает путь к файлу с логами сервиса |
После завершения редактирования файла настроек запускаем службу синхронизации времени:
Проверяем запустился ли сервер:
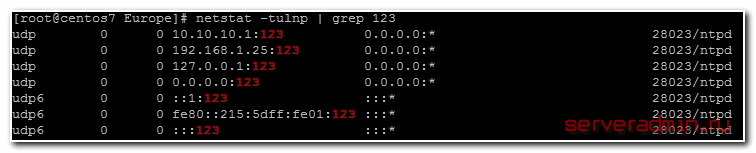
Все в порядке, служба слушает положенный порт 123. Проверим еще на всякий случай системные логи centos:
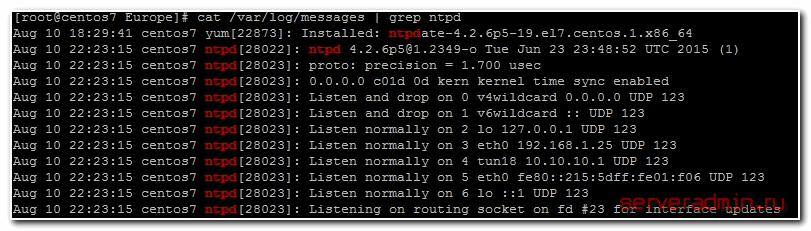
Все в порядке, сервер запущен и полностью готов к работе.
Теперь настроим автозапуск ntp вместе с загрузкой centos:
Наблюдать за работой службы ntp можно с помощью команды ntpq -p:
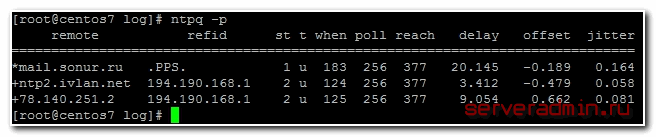
Что значат все эти данные:
| remote | Адрес удаленного эталона времени, с которого была синхронизация |
| refid | Указывает, откуда каждый эталон получает точное время. Это могут быть другие сервера времени, система GPS и другое |
| st | Stratum (уровень) это число от 1 до 16, которое указывает на точность эталона. 1- максимальная точность, 16 — сервер недоступен. Уровень вашего сервера будет равен уровню наименее точного удаленного эталона плюс 1. |
| poll | Интервал в секундах между опросами |
| reach | Восьмеричное представление массива из 8 бит, отражающего результаты последних восьми попыток соединения с эталоном. Бит выставлен, если удаленный сервер ответил. |
| delay | Время задержки ответа на запрос о точном времени |
| offset | Разница между вашим и удаленным сервером |
| jitter | Дисперсия (Jitter) — это мера статистических отклонений от значения смещения (поле offset) по нескольким успешным парам запрос-ответ. Чем меньше значение дисперсии, тем лучше, поскольку позволяет точнее синхронизировать время. |
Настройка NTP-сервера
По завершении установки откроем в текстовом редакторе файл /etc/ntp.conf. В нем хранятся все настройки программы. Рассмотрим их более подробно.
Параметры логирования
Первая строка конфигурационного файла выглядит так:
driftfile /var/lib/ntp/ntp.drift
В ней указывается файл для хранения информации о частоте смещения времени. В этом файле хранится значение, получаемое в результате предшествующих корректировок времени. Если внешние NTP-серверы по той или иной причине становятся недоступными, значение будет взятого из него.
Далее указывается файл, в который будут сохраняться логи синхронизации:
logfile /var/log/ntp.log
Список серверов для синхронизации
В конфигурационном файле указывается список NTP-серверов, с которыми будет осуществляться синхронизация. По умолчанию он выглядит так:
server 0.ubuntu.pool.ntp.org
server 1.ubuntu.pool.ntp.org
server 2.ubuntu.pool.ntp.org
server 3.ubuntu.pool.ntp.org
Каждая строка означает группу серверов, которые будут cообщать нашему серверу корректное время. Повысить точность синхронизации можно с помощью опции iburst (она указывает, что на сервер для синхронизации нужно посылать не один, а несколько пакетов):
server 0.ubuntu.pool.ntp.org iburst
server 1.ubuntu.pool.ntp.org iburst
server 2.ubuntu.pool.ntp.org iburst
server 3.ubuntu.pool.ntp.org iburst
Можно также указать предпочитаемый сервер при помощи опции prefer:
server 0.ubuntu.pool.ntp.org iburst prefer
NTP-серверы разбросаны по всему миру (вот, например, ). Чтобы обеспечить более точную установку системных часов, рекомендуется синхронизироваться только с ntp-серверами того региона, в котором географически расположен наш сервер. Для этого в конфигурационном файле /etc/ntp.conf нужно указать в адресах серверов региональный поддомен для pool.ntp.org:
- Азия — asia.pool.ntp.org;
- Европа — europe.pool.ntp org;
- Африка — africa.pool.ntp.org;
- Северная Америка — north-america.pool.ntp.org;
- Южная Америка — south-america.pool.ntp.org;
- Океания — oceania.pool.ntp.org.
Можно также указывать поддомены для отдельных стран (подробнее см. ). Имеется свой поддомен и для России — ru.pool.ntp.org
Резервный сервер точного времени
NTP-сервер, по какой-либо причине отключенный от Интернета, может передавать для синхронизации данные своих системных часов. Для этого в конфигурационный файл нужно добавить следующую строку:
server 127.127.1.0
Ограничения
В последнее время участились случаи использования NTP-серверов для усиления трафика в DDoS-атаках (подробнее об этом см., например, ).
1. Чтобы наш сервер не стал жертвой злоупотреблений, нелишним будет установить ограничения на доступ для внешних клиентов. По умолчанию в файлe /etc/ntp.conf установлены следующие ограничения:
restrict −4 default kod notrap nomodify nopeer noquery
restrict −6 default kod notrap nomodify nopeer noquery
Параметры nomodify, notrap, nopeer и noquery запрещают сторонним клиентам изменять что-либо на сервере. Параметр kod (эта аббревиатура означает kiss of death — «поцелуй смерти») обеспечивает дополнительную защиту: клиент, отправляющий слишком частые запросы, сначала получит так называемый kod-пакет (предупреждение об отказе в обслуживании), а затем будет отключен от сервера.
2. Чтобы с NTP-сервером могли синхронизироваться машины из локальной сети, добавим в конфигурационный файл следующую строку:
restrict 192.168.1.0 mask 255.255.255.0 nomodify notrap
3. Для локального хоста можно установить доступ к NTP-серверу без ограничений:
restrict 127.127.1.0
THE CONFIGURATION FILE
Ordinarily, ntpd reads the ntp.conf configuration file at startup in order to determine the synchronization sources and operating modes. It is also possible to specify a working, although limited, configuration entirely on the command line, obviating the need for a configuration file. This may be particularly useful when the local host is to be configured as a broadcast client, with servers determined by listening to broadcasts at run time.
Usually, the configuration file is installed as/etc/ntp.conf, but could be installed elsewhere (see the -c conffile command line option). The file format is similar to other Unix configuration files — comments begin with a # character and extend to the end of the line; blank lines are ignored.
Configuration commands consist of an initial command keyword followed by a list of option keywords separated by whitespace. Commands may not be continued over multiple lines. Options may be host names, host addresses written in numeric, dotted-quad form, integers, floating point numbers (when specifying times in seconds) and text strings. Optional arguments are delimited by in the options pages, while alternatives are separated by |46 The notation means an optional, indefinite repetition of the last item before the 46
Controlling timesyncd with timedatectl
Until recently, most network time synchronization was handled by the Network Time Protocol daemon or ntpd. This server connects to a pool of other NTP servers that provide it with constant and accurate time updates.
Ubuntu’s default install now uses timesyncd instead of ntpd. timesyncd connects to the same time servers and works in roughly the same way, but is more lightweight and more integrated with systemd and the low level workings of Ubuntu.
We can query the status of timesyncd by running with no arguments. You don’t need to use in this case:
This prints out the local time, universal time (which may be the same as local time, if you didn’t switch from the UTC time zone), and some network time status information. means that timesyncd is enabled, and indicates that the time has been successfully synced.
If timesyncd isn’t enabled, turn it on with timedatectl:
Run again to confirm the network time status. It may take a minute for the actual sync to happen, but eventually both and should read .
THE HUFF-N’-PUFF FILTER
In scenarios where a considerable amount of data are to be downloaded or uploaded over telephone modems, timekeeping quality can be seriously degraded. This occurs because the differential delays on the two directions of transmission can be quite large. In many cases the apparent time errors are so large as to exceed the step threshold and a step correction can occur during and after the data transfer.
The huff-n’-puff filter is designed to correct the apparent time offset in these cases. It depends on knowledge of the propagation delay when no other traffic is present, such as during other than work hours. The filter remembers the minimum delay over the most recent interval measured usually in hours. Under conditions of severe delay, the filter corrects the apparent offset using the sign of the offset and the difference between the apparent delay and minimum delay. The name of the filter reflects the negative (huff) and positive (puff) correction, which depends on the sign of the offset. The filter is activated by the tinker huffpuff command, as described in the Miscellaneous Options page.
Conclusion
You learned how to verify that your NTP configuration is working properly. Now you know how to check the status of your date and time, synchronized with upstream time servers. For more info see ntpd docs here.
Get the latest tutorials on Linux, Open Source & DevOps viaRSS feed ➔
Weekly email newsletter ➔
ADVERTISEMENT
| Category | List of Unix and Linux commands |
|---|---|
| Documentation | help • mandb • man • pinfo |
| Disk space analyzers | df • duf • ncdu • pydf |
| File Management | cat • cp • less • mkdir • more • tree |
| Firewall | Alpine Awall • CentOS 8 • OpenSUSE • RHEL 8 • Ubuntu 16.04 • Ubuntu 18.04 • Ubuntu 20.04 |
| Linux Desktop Apps | Skype • Spotify • VLC 3 |
| Modern utilities | bat • exa |
| Network Utilities | NetHogs • dig • host • ip • nmap |
| OpenVPN | CentOS 7 • CentOS 8 • Debian 10 • Debian 8/9 • Ubuntu 18.04 • Ubuntu 20.04 |
| Package Manager | apk • apt |
| Processes Management | bg • chroot • cron • disown • fg • glances • gtop • jobs • killall • kill • pidof • pstree • pwdx • time • vtop |
| Searching | ag • grep • whereis • which |
| Shell builtins | compgen • echo • printf |
| Text processing | cut • rev |
| User Information | groups • id • lastcomm • last • lid/libuser-lid • logname • members • users • whoami • who • w |
| WireGuard VPN | Alpine • CentOS 8 • Debian 10 • Firewall • Ubuntu 20.04 |
Настройка клиента Linux
Для клиентов можно выбрать несколько стратегий настройки — мы рассмотрим 3:
- С помощью Chrony.
- Сервис ntpd.
- Утилиты ntpdate.
Начнем с Chrony.
Chrony
Команда для установки зависит от типа дистрибутива Linux.
а) Ubuntu / Debian:
apt-get install chrony
б) CentOS 7,8
yum install chrony
После установки открываем /etc/chrony.conf:
vi /etc/chrony.conf
… и в качестве сервера оставляем только наш локальный сервер, например:
server 192.168.156.215 iburst
Разрешаем автозапуск сервиса:
systemctl enable chronyd || systemctl enable chrony
Перезапускаем сервис:
systemctl restart chronyd || systemctl restart chrony
Проверить состояние работы можно командой:
chronyc sources
NTP
Устанавливаем ntp:
а) Ubuntu / Debian:
apt-get install ntp
б) CentOS 7:
yum install ntp
В настройка /etc/ntp.conf в качестве сервера оставляем только наш локальный сервер, например:
server 192.168.0.15
Остальные pool и server удаляем или комментируем.
Перезапускаем NTP:
systemctl restart ntp || systemctl restart ntpd
Проверить состояние можно командой:
ntpq -p
ntpdate
Утилита командной строки выполняет разовую синхронизацию. Ее можно установить из репозитория.
а) Ubuntu / Debian:
apt-get install ntpdate
б) CentOS 7:
yum install ntpdate
Чтобы автоматизировать процесс, добавляем задание в cron:
crontab -e
0 0 * * * /usr/sbin/ntpdate 192.168.0.15
* в данном примере задание будет выполняться раз в день в 00:00. /usr/sbin/ntpdate — полный путь расположения утилиты, в разных системах может быть разным — проверить стоит командой which ntpdate.
Установка локальной даты и времени
С помощью команды ntpdate можно установить на сервере локальную дату и время, отправив соответствующий запрос к NTP-серверу:
$ ntpdate -u 192.168.1.1
Текущий статус ntpd можно проверить с помощью следующей команды:
$ ntpdc -c sysinfo
Ее вывод выглядит так:
system peer: 62.76.96.10
system peer mode: client
leap indicator: 11
stratum: 3
precision: −21
root distance: 0.01314 s
root dispersion: 1.66203 s
reference ID:
reference time: d768a894.3824a929 Thu, Jul 10 2014 9:52:20.219
system flags: auth monitor ntp kernel stats
jitter: 0.393768 s
stability: 0.000 ppm
broadcastdelay: 0.000000 s
authdelay: 0.000000 s
NTPSec
Эрик Стивен РеймондСобор и Базаробосновался
- Недокументированные, устаревшие, устаревшие или сломанные refclock.
- Неиспользуемая библиотека ICS.
- libopts/autogen.
- Старый код для Windows.
- ntpdc.
- Autokey.
- C код ntpq переписан на Python.
- C код sntp/ntpdig переписан на Python.
- Значительно усилена защита кода от переполнения буфера. Чтобы предотвратить переполнение буфера, все небезопасные строковые функции (strcpy / strcat / strtok / sprintf / vsprintf / gets) заменили безопасными версиями, которые реализуют ограничение размера буфера.
- Добавлена поддержка NTS.
- Десятикратно повысили точность временного шага с помощью привязки физического оборудования. Это связано с тем, что современные компьютерные часы стали гораздо точнее тех, что были в момент зарождения NTP. Больше всех от этого выиграли GPSDO и выделенные радиостанции времени.
- Количество языков программирования сократилось до двух. Вместо скриптов Perl, awk и даже S, теперь сплошной Python. За счет этого больше возможностей повторного использования кода.
- Вместо лапши скриптов autotools проект стал использовать систему сборки программного обеспечения waf.
- Обновили и реорганизовали документацию проекта. Из противоречивой, и местами архаичной коллекции документов создали вполне сносную документацию. Каждый ключ командной строки и каждая сущность конфигурации теперь имеют единую версию правды. Кроме того, страницы руководства и веб документация теперь создаются из одних и тех же основных файлов.
Add Reference Clock Peers
NTP relies on reference clock servers, or peers, in order to synchronize the local system clock. One or more peers can be added to the configuration file, as follows:
server <address>
The address operand is a domain name or IP address of a NTP server to be used for synchronization.
The ‘prefer’ option may be used to specify a preferred peer. All things being equal, a preferred peer will be selected by NTP from a list of similarly performing peers. The prefer option should only be specified once.
It is also considered best practice to specify an odd number of peers. A time offset that is out of tolerance in any one peer can then be easily detected. The peer can then be discarded by the selection algorithm.
Tips and tricks
Start ntpd on network connection
ntpd can be started by your network manager, so that the daemon only runs when the computer is online.
- Netctl
This article or section needs language, wiki syntax or style improvements. See Help:Style for reference.
Append the following lines to your netctl profile:
ExecUpPost='/usr/bin/ntpd || true'
ExecDownPre='killall ntpd || true'
- NetworkManager
The ntpd daemon can be brought up/down along with a network connection through the use of NetworkManager’s scripts. The AUR package installs one, pre-configured to start and stop the with a connection.
- Wicd
For Wicd, create a start script in the directory and a stop script in the directory. Remember to make them executable:
/etc/wicd/scripts/postconnect/ntpd
#!/bin/bash
systemctl start ntpd &
/etc/wicd/scripts/predisconnect/ntpd
#!/bin/bash
systemctl stop ntpd &
Note: You are advised to customize the options for the ntpd command as explained in .
See also .
- KDE
Using ntpd with GPS
Most of the articles online about configuring ntpd to receive time from a GPS suggest to use the SHM (shared memory) method. However, at least since ntpd version 4.2.8 a much better method is available. It connects directly to gpsd, so needs to be installed.
Add these lines to your :
/etc/ntp.conf
This will work as long as you have gpsd working. It connects to gpsd via the local socket and queries the «gpsd_json» object that is returned.
To test the setup, first ensure that gpsd is working by running:
$ cgps -s
Then wait a few minutes and run . This will show if ntpd is talking to gpsd:
$ ntpq -p
remote           refid            st t when poll reach   delay   offset  jitter
 ==================================================================================
*GPSD_JSON(0)    .GPS.            0 l   55   64  377    0.000    2.556  14.109
Tip:
- If the reach column is 0, it means ntpd has not been able to talk to gpsd. Wait a few minutes and try again. Sometimes it takes ntpd a while.
- The GPS device must have PPS capabilities. You can test if your device is capable running .
Note: ntpd expects that your GPS device is called e.g. . If your GPS device is connected via USB, it may appear as instead, and you may have to create a symlink and run gpsd on that linked so that the line appears as expected. gpsd should be run with the flag on the line and use on the line in the config file.
Running in a chroot
Note: ntpd should be started as non-root (default in the Arch Linux package) before attempting to jail it in a chroot, since chroots are relatively useless at securing processes running as root.
Create a new directory if it does not exist and a file named inside with the following content:
ExecStart=
ExecStart=/usr/bin/ntpd -g -u ntp:ntp -i /var/lib/ntp
Then, edit to change the driftfile path such that it is relative to the chroot directory, rather than to the real system root. Change:
driftfile /var/lib/ntp/ntp.drift
to
driftfile /ntp.drift
Create a suitable chroot environment so that getaddrinfo() will work by creating pertinent directories and files (as root):
# mkdir /var/lib/ntp/etc /var/lib/ntp/lib /var/lib/ntp/proc
# mkdir /var/lib/ntp/usr /var/lib/ntp/usr/lib
# touch /var/lib/ntp/etc/resolv.conf /var/lib/ntp/etc/services
and by bind-mounting the aformentioned files:
/etc/fstab
...
#ntpd chroot mounts
/etc/resolv.conf  /var/lib/ntp/etc/resolv.conf none bind 0 0
/etc/services	  /var/lib/ntp/etc/services none bind 0 0
/lib		  /var/lib/ntp/lib none bind 0 0
/usr/lib	  /var/lib/ntp/usr/lib none bind 0 0
/proc		  /var/lib/ntp/proc none bind 0 0
# mount -a
Finally, restart daemon again. Once it restarted you can verify that the daemon process is chrooted by checking where symlinks to:
# ps -C ntpd | awk '{print $1}' | sed 1d | while read -r PID; do ls -l /proc/$PID/root; done
should now link to instead of .
It is relatively difficult to be sure that your driftfile configuration is actually working without waiting a while, as ntpd does not read or write it very often. If you get it wrong, it will log an error; if you get it right, it will update the timestamp. If you do not see any errors about it after a full day of running, and the timestamp is updated, you should be confident of success.
Restrict listening sockets
You can limit sockets ntpd is listening to using the interface option:
interface [all | ipv4 | ipv6 | wildcard | name | address]
like
/etc/ntp.conf
interface listen lo
interface listen enp3s0
interface ignore enp5s0
Step 4 — Adding the Server to the NTP Pool
Once logged in, you’ll see the simple interface for adding servers:

Enter your server’s IP address and click Submit.
The next screen asks you to verify that it identified the region of your server. If it shows your server in a different region than you expect, use the Comment box to let them know.

If you are happy, confirm the entry by clicking Yes, this is my server, add it!
Your server is now part of the NTP Pool Project. Visit to see information the NTP Pool’s monitoring system has collected about your server. It checks your server a few times per hour and displays offset data, alog with the score of your system. As long as your server is keeping good time and is reachable, the score will rise untill it reaches 20 points. Only servers with a score higher than 10 are used in the pool.
Troubleshooting Connectivity Issues
If you are having trouble getting your server to sync you might have a packet firewall in place dropping your outgoing packets on port . Take a look at to learn how to check the status of the firewall.
If the NTP Pool Project’s monitoring station can’t reach your NTP server and your server score is going down, or you can’t use your server to sync some other clock, you might have a packet firewall in place dropping your incoming traffic on port . Check your firewall status.
LEAP SECOND PROCESSING
As provided by international agreement, an extra second is sometimes inserted in Coordinated Universal Time (UTC) at the end of a selected month, usually June or December. The National Institutes of Standards and Technology (NIST) provides an historic leapseconds file at time.nist.gov for retrieval via FTP. When this file, usually called ntp-leapseconds.list, is copied and installed in a directory. The leapfile configuration command specifies the path to this file. At startup, ntpd reads it and initializes three leapsecond values: the NTP seconds at the next leap event, the offset of UTC relative to International Atomic Time (TAI) after the leap and the NTP seconds when the leapseconds file expires and should be retrieved again.
If a host does not have the leapsecond values, they can be obtained over the net using the Autokey security protocol. Ordinarily, the leapseconds file is installed on the primary servers and the values flow from them via secondary servers to the clients. When multiple servers are involved, the values with the latest expiration time are used.
If the latest leap is in the past, nothing further is done other than to install the TAI offset. If the leap is in the future less than 28 days, the leap warning bits are set. If in the future less than 23 hours, the kernel is armed to insert one second at the end of the current day. If the kernel is enabled, the leap is done automatically at that time; otherwise, the clock is effectively stopped for one second at the leap. Additional details are in the The NTP Timescale and Leap Seconds white paper
If none of the above provisions are available, dsependent servers and clients tally the leap warning bits of surviving servers and reference clocks. When a majority of the survivors show warning, a leap is programmed at the end of the current month. During the month and day of insertion, they operate as above. In this way the leap is propagated at all dependent servers and clients.
