Полезные редиректы в nginx
Введение
Немного расскажу своими словами о том, как работает модуль ngx_http_proxy_module. Именно он реализует весь функционал, о котором пойдет речь. Допустим, у вас в локальной или виртуальной сети есть какие-то сервисы, не имеющие прямого доступа из интернета. А вы хотите таковой иметь. Можно пробрасывать нужные порты на шлюзе, можно что-то еще придумывать. А можно сделать проще всего — настроить единую точку входа на все свои сервисы в виде nginx сервера и с него проксировать различные запросы к нужным серверам.
Расскажу на конкретных примерах, где я это использую. Для наглядности и простоты буду прям по порядку перечислять эти варианты:
- Ранее я рассказывал о настройке чат серверов — matrix и mattermost. В этих статьях я как раз рассказывал о том, как проксировать запросы в чат с помощью nginx. Прошелся по теме вскользь, не останавливаясь подробно. Суть в том, что вы настраиваете на любом виртуальном сервере эти чаты, помещаете их в закрытые периметры сети без лишних доступов и просто проксируете запросы на эти сервера. Они идут через nginx, который у вас смотрит во внешний интернет и принимает все входящие соединения.
- Допустим, у вас есть большой сервер с множеством контейнеров, например докера. На нем работает множество различных сервисов. Вы устанавливаете еще один контейнер с чистым nginx, на нем настраиваете проксирование запросов на эти контейнеры. Сами контейнеры мапите только к локальному интерфейсу сервера. Таким образом, они будут полностью закрыты извне, и при этом вы можете гибко управлять доступом.
- Еще один популярный пример. Допустим, у вас есть сервер с гипервизором proxmox или любым другим. Вы настраиваете на одной из виртуальных машин шлюз, создаете локальную сеть только из виртуальных машин без доступа в нее извне. Делаете в этой локальной сети для всех виртуальных машин шлюз по-умолчанию в виде вашей виртуальной машины со шлюзом. На виртуальных серверах в локальной сети размещаете различные сервисы и не заморачиваетесь с настройками фаервола на них. Вся их сеть все равно не доступна из интернета. А доступ к сервисам проксируете с помощью nginx, установленным на шлюз или на отдельной виртуальной машине с проброшенными на нее портами.
- Мой личный пример. У меня дома есть сервер synology. Я хочу организовать к нему простой доступ по https из браузера по доменному имени. Нет ничего проще. Настраиваю на сервере nginx получение бесплатного сертификата , настраиваю проксирование запросов на мой домашний ip, там на шлюзе делаю проброс внутрь локалки на synology сервер. При этом я могу фаерволом ограничить доступ к серверу только одним ip, на котором работает nginx. В итоге на самом synology вообще ничего не надо делать. Он и знать не знает, что к нему заходят по https, по стандартному порту 443.
- Допустим, у вас большой проект, разбитый на составные части, которые живут на разных серверах. К примеру, на отдельном сервере живет форум, по пути /forum от основного домена. Вы просто берете и настраиваете проксирование всех запросов по адресу /forum на отдельный сервер. Точно так же можно без проблем все картинки перенести на другой сервер и проксировать к ним запросы. То есть вы можете создать любой location и переадресовывать запросы к нему на другие сервера.
Надеюсь в общем и целом понятно, о чем идет речь. Вариантов использования много. Я привел самые распространенные, которые пришли в голову и которые использую сам. Из плюсов, которые считаю наиболее полезными именно из своих кейсов, отмечу 2:
- Без проблем можете настроить https доступ к сервисам, при этом совершенно не трогая эти сервисы. Вы получаете и используете сертификаты на nginx сервере, используете https соединение с ним, а сам nginx уже передает информацию на сервера со службами, которые могут работать по обычному http и знать не знают о https.
- Вы очень легко можете менять адреса, куда проксируете запросы. Допустим у вас есть сайт, его запросы проксируются на отдельный сервер. Вы подготовили обновление или переезд сайта. Отладили все на новом сервере. Теперь вам достаточно на сервере nginx изменить адрес старого сервера на новый, куда будут перенаправляться запросы. И все. Если что-то пойдет не так, можете оперативно вернуть все обратно.
С теорией закончил. Перейдем теперь к примерам настройки. В своих примерах я буду использовать следующие обозначения:
| blog.zeroxzed.ru | доменное имя тестового сайта |
| nginx_srv | имя внешнего сервера с установленным nginx |
| blog_srv | локальный сервер с сайтом, куда проксируем соединения |
| 94.142.141.246 | внешний ip nginx_srv |
| 192.168.13.31 | ip адрес blog_srv |
| 77.37.224.139 | ip адрес клиента, с которого я буду заходить на сайт |
What is a Redirect?
A redirect is a web server function that will redirect traffic from one URL to another. Redirects are an important feature when the need arises. There are several different types of redirects, but the more common forms are temporary and permanent. In this article, we will provide some examples of redirecting through the vhost file, forcing a secure HTTPS connection, redirection to www and non-www as well as the difference between temporary and permanent redirects.
Note
As this is an Nginx server, any .htaccess rules will not apply. If your using the other popular web server, Apache, you’ll find this article useful.
Temporary and Permanent Nginx Redirect Explained
Temporary redirects is beneficial if a page location needs to change from one place to another location temporarily. The redirects response code 302 is used for designating the temporary movement of a page.
If website maintenance is being performed, temporary redirects are used to notify the users that the website is unavailable. Another example is when you make temporary redirects of an incomplete page; you link that page to another point or the main page:
Visitor–> Website Page–> Website is under maintenance
On the other hand, a permanent Nginx redirect informs the web browser that it should permanently link the old page or domain to a new location or domain. To map this change, the redirects response code 301 is used for designating the permanent movement of a page. These kinds of redirects are helpful when the user wants to change the domain name and no longer wants a browser to access it.
For example, when you wish to change the domain of your website or create a new page for an older one:
Visitor–> Click www.devisers.in/home -> Redirected to www. devisers. in/home1
Page Redirects in Nginx
Remember, first you have to access your VPS through SSH. If you’re having trouble, check out our PuTTY tutorial.
In Nginx, most redirects can be achieved with the help of inbuilt rewrite feature. This is the default feature that’s available on a clean installation of Nginx and can form both kinds of Nginx redirect – i.e. permanent and temporary. In its plain form, it takes a minimum of two cases i.e. old URL and new URL.
It is simple and easy to redirect pages to a temporary or permanent location on Nginx web server. In the location /etc/nginx/sites-enabled/default you should paste in the following code, while changing the variables to suit your needs:
Location path_pattern {
     rewrite ^/oldURL$ https://www.domainone.com/newURL redirect;
}
If you want to redirect the page to another link permanently, simple use “permanent” instead of “redirect” in the above command. Meanwhile, the path_patern is typically /index.html.
Nginx Redirecting a Domain
For redirecting one domain to another use the below command in the terminal:
server {
      listen 80;
      hostname devisers.in www.devisers.in;
      rewrite ^ http://www.devisers.com$request_uri? permanent;
}
Here, we use two domains. The one we want to redirect – www.devisers.in, and the new one – www.devisers.com.
Nginx Redirect from HTTP to HTTPS (SSL)
HTTP and HTTPS use different ports – HTTP port 80 and HTTPS port 443. Using HTTPS is much more helpful since it protects you from MITM attacks that can hijack your session. Remember, that for this method to work, you need to have an SSL already set up. So, to protect all the information sent between you and your visitors, it is beneficial to redirect all the requests coming from HTTP to HTTPS. For that, we can add this modification to the same file:
server {
listen 80 default_server;
server_name _;
return 301 https://$host$request_uri;
}
Now all traffic for HTTP default server redirects to HTTPS.
Nginx Redirect Specific Sites
This is essential if you are using various sites or apps and want to redirect only a single site. Follow the steps below:
server {
listen 80;
server_name devisers.in;
     return 301 https://devisers.in$request_uri;
}
Here, we are redirecting the site http://www.devisers.in to https://www.devisers.in
Redirect From www to non-www
There are many times when you want your visitors to access the plain domain of your web page such as devisers.in instead of www.devisers.in. Although there are many options to redirect from www to non-www in Nginx, one of the easy way to do so is as described below:
server {
    server_name www.devisers.in;
    return 301 $scheme://devisers.in$request_uri;
}
Important: This is permanent Redirect or “301 Redirect”.
Restart the Nginx web server to put the changes into effect using the command:
sudo systemctl restart Nginx
If you wish to redirect from non-www to www, simply replace the website URL’s mentioned in the above command. Replace www.devisers.in with devisers.in and vice versa.
Статические файлы через Nginx
Чтобы уменьшить нагрузку на Apache мы можем обрабатывать все статические файлы в Nginx, как правило, это очень сильно увеличивает выдерживаемую нагрузку, поскольку Nginx способен работать быстрее с большим количеством подключений и занимать меньше ресурсов.
Нам нужно добавить несколько строк в /etc/nginx/sites-available/apache:
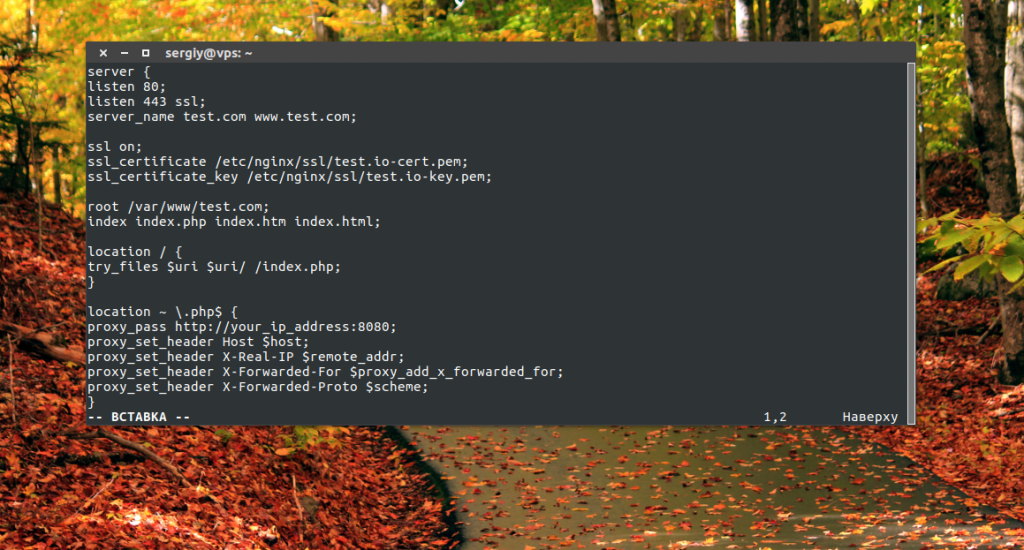
Мы устанавливаем корень сайта в /var/www/test.com, и пытаемся отдать оттуда все статические файлы, а файлы с расширением .php будем обрабатывать в Apache. Также дополнительно мы закрываем доступ ко всем скрытым файлам.
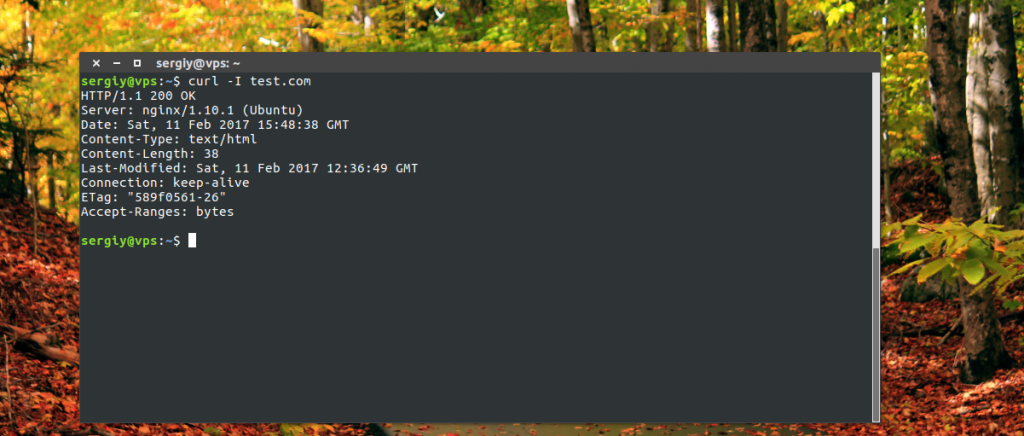
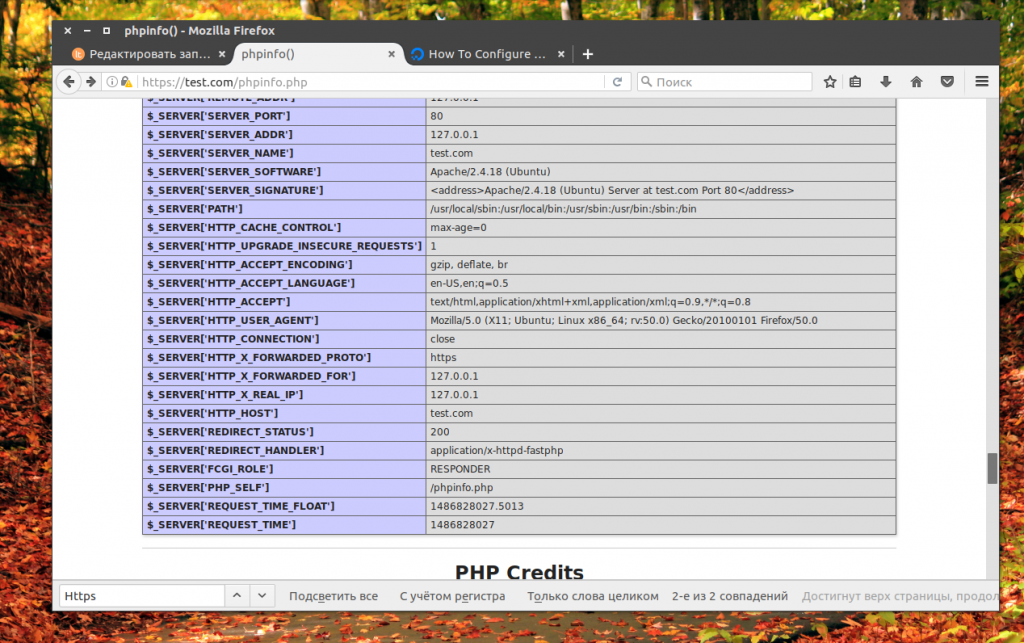
Теперь откройте несколько раз сайт в браузере, динамические страницы phpinfo.php и статическую index.html, а затем посмотрите в лог файл, где вы обнаружите что Apache обрабатывает только динамику:
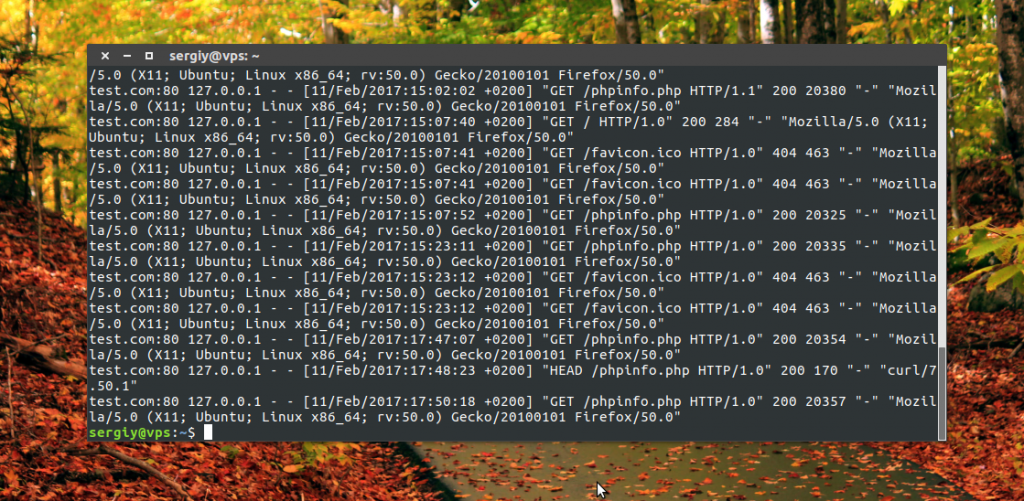
Теперь проксирование Nginx работает так же как и на большинстве серверов интернета.
2:02 SSL Handshake (Diffie‑Hellman)
This is your SSL/TLS handshake. It’s a little complicated; there’s a lot of moving parts but essentially, if you take a step back it’s an extra one or two round trips between the client and the server that send cryptographic information. In this case, you have several options right here – there’s server randoms, there’s client randoms; this is all kind of deep stuff you don’t really need to know.
All you need to know is that the server itself sends a public key, and the client and server establish a shared secret that they can use to encrypt the communication. So, all the communication between the visitor and the server is encrypted with a symmetric key, meaning both parties have the same key. There’s also an integrity key, so in this case an HMAC, but I’ll skip over this diagram for now and go to the more salient question of “why set up HTTPS?”.
0:00 NGINX + HTTPS 101 Overview
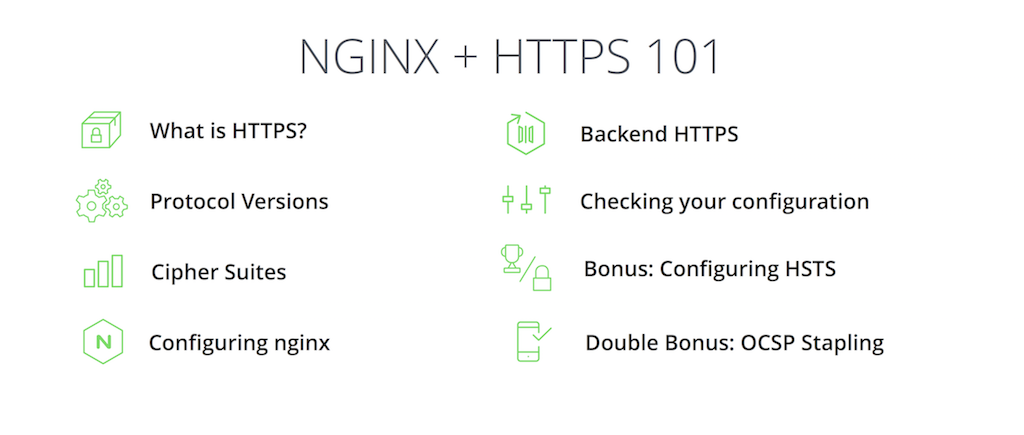
As an overview, this is what I’m going to cover in this talk. What is HTTPS? Everybody might recognize HTTPS from the browser, and have a good sense of what it is. I’ll go over the basics again and go into a little bit more detail about what protocol versions there are, what cipher suites there are, and the whole point of this talk is how to configure NGINX to set your site up for service with HTTPS.
Beyond that there’s the question of using HTTPS as a proxy; so, if your NGINX is in front of another application, how do you set NGINX up to act as an HTTPS client.
From there I’ll go into some ways you can check your configuration to see that it is the most secure and the most up‑to‑date, as well as some bonus topics that help you get the A+ you need in security.
How to Redirect
When it comes to Nginx, that is handled within a .conf file, typically found in the document root directory of your site(s), /etc/nginx/sites-available/directory_name.conf. The document root directory is where your site’s files live and it can sometimes be in the /html if you have one site on the server. Or if your server has multiple sites it can be at /domain.com. Either way that will be your .conf file name. In the /etc/nginx/sites-available/ directory you’ll find the default file that you can copy or use to append your redirects. Or you can create a new file name html.conf or domain.com.conf.
Note
If you choose to create a new file be sure to update your symbolic links in the /etc/nginx/sites-enabled. With the command:
The first example we’ll cover is redirection of a specific page/directory to the new page/directory.
Temporary Page to Page Redirect
Permanent Page to Page Redirect
Permanent www to non-www Redirect
Permanent Redirect to www
Sometimes the need will arise to change the domain name for a website. In this case, a redirect from the old sites URL to the new sites URL will be very helpful in letting users know the domain was moved to a new URL.
The next example we’ll cover is redirecting an old URL to a new URL.
Permanent Redirect to New URL
We’ve added the redirect using the rewrite directive we discussed earlier. The ^/(.*)$ regular expression will use everything after the / in the URL. For example, http://olddomain.com/index.html will redirect to http://newdomain.com/index.html. To achieve the permanent redirect, we add permanent after the rewrite directive as you can see in the example code.
When it comes to HTTPS and being fully secure it is ideal for forcing everyone to use https:// instead of http://.
Redirect to HTTPS
After these rewrite rules are in place, testing the configuration prior to running a restart is recommended. Nginx syntax can be checked with the -t flag to ensure there is not a typo present in the file.
Nginx Syntax Check
If nothing is returned the syntax is correct and Nginx has to be reloaded for the redirects to take effect.
Restarting Nginx
For CentOS 7 which unlike CentOS 6, uses systemd:
nginx
nginx — это HTTP-сервер и обратный прокси-сервер,
почтовый прокси-сервер,
а также TCP/UDP прокси-сервер общего назначения,
изначально написанный Игорем Сысоевым.
Уже длительное время он обслуживает
серверы многих высоконагруженных российских сайтов, таких как
Яндекс,
Mail.Ru,
и
Рамблер.
Согласно статистике Netcraft nginx обслуживал или проксировал
22.38%
самых нагруженных сайтов в августе 2021 года.
Вот некоторые примеры успешного внедрения nginx (тексты на английском языке):
Dropbox,
Netflix,
Wordpress.com,
FastMail.FM.
Исходные тексты и документация распространяются под
BSD-подобной лицензией из 2 пунктов.
Коммерческая поддержка осуществляется компанией
Nginx, Inc.
-
Обслуживание статических запросов,
индексных
файлов,
автоматическое
создание списка файлов,
; -
Акселерированное
обратное проксирование с кэшированием,
распределение нагрузки
и отказоустойчивость; -
Акселерированная поддержка
FastCGI,
uwsgi,
SCGI и
memcached
серверов с кэшированием,
распределение нагрузки
и отказоустойчивость; -
Модульность, фильтры, в том числе
сжатие (gzip),
byte-ranges (докачка),
chunked ответы,
XSLT-фильтр,
SSI-фильтр,
преобразование
изображений;
несколько подзапросов на одной странице, обрабатываемые в SSI-фильтре
через прокси или FastCGI/uwsgi/SCGI, выполняются параллельно; -
Поддержка SSL и
расширения TLS SNI; -
Поддержка HTTP/2
с приоритизацией на основе весов и зависимостей.
-
Виртуальные серверы,
определяемые по IP-адресу и имени; -
Поддержка
и pipelined соединений;
-
,
,
,
запись в syslog; - для ошибок 3xx-5xx;
-
rewrite-модуль:
изменение URI
с помощью регулярных выражений; -
в зависимости от
адреса клиента; -
Ограничение доступа в зависимости от
адреса клиента,
по паролю
(HTTP Basic аутентификация) и по
результату
подзапроса; - Проверка HTTP referer;
-
Методы
PUT, DELETE, MKCOL, COPY и MOVE; -
FLV
и
MP4
стриминг; - ;
-
Ограничение числа одновременных
соединений и
запросов
с одного адреса; - Геолокация по IP-адресу;
- A/B-тестирование;
- Зеркалирование запросов;
- Встроенный Perl;
- сценарный язык njs.
-
Перенаправление пользователя на
IMAP-
или
POP3-сервер
с использованием внешнего HTTP-сервера
аутентификации; -
Проверка пользователя с помощью внешнего HTTP-сервера
аутентификации
и перенаправление соединения на внутренний
SMTP-сервер; -
Методы аутентификации:
-
:
USER/PASS, APOP, AUTH LOGIN/PLAIN/CRAM-MD5; -
:
LOGIN, AUTH LOGIN/PLAIN/CRAM-MD5; -
:
AUTH LOGIN/PLAIN/CRAM-MD5;
-
:
- Поддержка SSL;
-
Поддержка
.
-
Проксирование
TCP и UDP; -
Поддержка SSL и
расширения TLS
SNI
для TCP; -
Распределение нагрузки
и отказоустойчивость; -
Ограничение доступа в зависимости от
адреса клиента; -
Выполнение разных функций в зависимости от
адреса клиента; -
Ограничение числа одновременных
соединений
с одного адреса; -
,
,
,
запись в syslog; - Геолокация по IP-адресу;
- A/B-тестирование;
- сценарный язык njs.
-
Один главный и несколько рабочих процессов, рабочие процессы работают под
непривилегированным пользователем; - Гибкость конфигурации;
-
и без перерыва в обслуживании клиентов;
-
Поддержка
kqueue (FreeBSD 4.1+),
epoll (Linux 2.6+),
/dev/poll (Solaris 7 11/99+),
event ports (Solaris 10),
select и poll; -
Использование возможностей, предоставляемых kqueue, таких как
EV_CLEAR, EV_DISABLE (для временного выключения события),
NOTE_LOWAT, EV_EOF, число доступных данных, коды ошибок; -
Использование возможностей, предоставляемых epoll, таких как
EPOLLRDHUP (Linux 2.6.17+, glibc 2.8+) и
EPOLLEXCLUSIVE (Linux 4.5+, glibc 2.24+); -
Поддержка sendfile (FreeBSD 3.1+, Linux 2.2+, macOS 10.5+),
sendfile64 (Linux 2.4.21+) и sendfilev (Solaris 8 7/01+); -
Поддержка
(FreeBSD 4.3+, Linux 2.6.22+); -
Поддержка
(FreeBSD 4.4+, Linux 2.4+, Solaris 2.6+, macOS);
-
accept-фильтров (FreeBSD 4.1+, NetBSD 5.0+) и TCP_DEFER_ACCEPT (Linux 2.4+);
-
На 10 000 неактивных HTTP keep-alive соединений расходуется
около 2.5M памяти; - Минимум операций копирования данных.
-
FreeBSD 3 — 12 / i386;
FreeBSD 5 — 12 / amd64;
FreeBSD 11 / ppc;
FreeBSD 12 / ppc64; -
Linux 2.2 — 4 / i386;
Linux 2.6 — 5 / amd64;
Linux 3 — 4 / armv6l, armv7l, aarch64, ppc64le; -
Solaris 9 / i386, sun4u;
Solaris 10 / i386, amd64, sun4v;
Solaris 11 / x86; - AIX 7.1 / powerpc;
- HP-UX 11.31 / ia64;
- macOS / ppc, i386, x86_64;
-
Windows XP,
Windows Server 2003,
Windows 7,
Windows 10.
Example 1 — Moving to a Different Domain
If you have established a web presence and would like to change your domain to a new address, it is best not to just abandon your old domain. Bookmarks to your site and links to your site located on other pages throughout the internet will break if your content disappears without any instructions to the browser about how to find its new location. Changing domains without redirecting will cause your site to lose traffic from previous visitors.
In this example, we will configure a redirect from the old domain called to the new one called . We’ll use permanent redirects here because the old domain will be taken down, and all traffic should go to the new domain from now on.
Let’s assume you have your website configured to be served from a single domain called already configured in Nginx as follows:
/etc/nginx/sites-available/domain1.com
We’ll also assume you are already serving your future version of website at :
/etc/nginx/sites-available/domain2.com
Let’s change the server block configuration file to add a permanent redirect to :
/etc/nginx/sites-available/domain1.com
We’ve added the aforementioned redirect using a directive. The regular expression matches everything after the in the URL. For example, will get redirected to . To achieve the permanent redirect we simply add after the directive.
Note: Remember to restart Nginx after configuration changes using .
Шаг 1. Установка или обновление NGINX
Для поддержки HTTP/2 веб-сервер NGINX должен быть версии 1.9.5 и старше. В данной версии появился модуль ngx_http_v2_module.
Обновление
Если в системе уже установлен nginx, проверяем его версию следующей командой:
nginx -v
Если она ниже необходимой, обновляем пакет:
yum update nginx
Установка
Для этого сначала создаем файл для настройки репозитория:
vi /etc/yum.repos.d/nginx.repo
И добавляем в него следующее:
name=nginx repo
baseurl=http://nginx.org/packages/centos/$releasever/$basearch/
gpgcheck=0
enabled=1
После обновляем список пакетов:
yum update
И теперь можно установить nginx:
yum install nginx
Подробнее пошаговый процесс установки NGINX на CentOS.
Redirection in Nginx
The ability to forward the URL of the website to another address or point based on your criteria is an essential feature of the Nginx web server. An Nginx redirect is simple and easy to set up. Often users choose to redirect a page that has good SEO ranking. For instance when switching from a CMS to another platform. This will completely change your URL composition. So, to keep your current page with the good SERP position, you can reroute the old URL to the new page.
In this tutorial, we will guide you through creating two kinds of Nginx redirect: permanent and temporary. Remember to have Nginx installed on your VPS.
3:05 Why Set Up HTTPS?
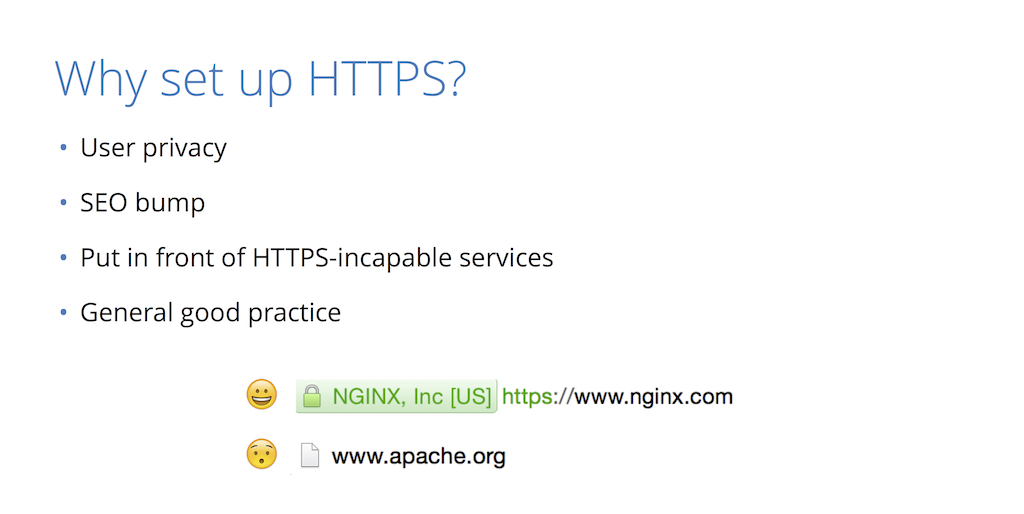
Well, the main reason is user privacy. In the case of the service communication, it’s privacy of information – how much do you trust the networks you’re using to transmit this information? Do you trust these networks to not inject things into your traffic and to be able to read what gets transmitted over? Also recently, if you’re using this for a public website, it provides an SEO advantage so Google will more highly rank sites that support HTTPS than those that do not.
Another thing you can do for HTTPS (this is one of the main use cases for NGINX) is to put it in front of services that don’t necessarily support HTTPS natively or don’t support the most modern, up‑to‑date version of SSL and TLS. So, what you get with NGINX is the best, state‑of‑the‑art implementations of all the crypto algorithms that you don’t really need to think about, and in general it’s good practice.
So, if someone’s going to a site, they like to see that little happy lock icon. In this case this is nginx.com, which has HTTPS enabled as well as HSTS (a feature I’ll talk about later). You can’t really go to the regular HTTP version of the site anymore; the browser knows to always go to HTTPS. Another thing you see here is there’s a nice NGINX, Inc with the that just shows this is an Extended Validation Cert – essentially, a certificate that says NGINX is who it says it is. They paid a little bit extra for that and did some vetting.
Temporary and Permanent Nginx Redirect Explained
Temporary redirects is beneficial if a page location needs to change from one place to another location temporarily. The redirects response code 302 is used for designating the temporary movement of a page.
If website maintenance is being performed, temporary redirects are used to notify the users that the website is unavailable. Another example is when you make temporary redirects of an incomplete page; you link that page to another point or the main page:
Visitor–> Website Page–> Website is under maintenance
On the other hand, a permanent Nginx redirect informs the web browser that it should permanently link the old page or domain to a new location or domain. To map this change, the redirects response code 301 is used for designating the permanent movement of a page. These kinds of redirects are helpful when the user wants to change the domain name and no longer wants a browser to access it.
For example, when you wish to change the domain of your website or create a new page for an older one:
Visitor–> Click www.devisers.in/home -> Redirected to www. devisers. in/home1
Page Redirects in Nginx
Remember, first you have to access your VPS through SSH. If you’re having trouble, check out our PuTTY tutorial.
In Nginx, most redirects can be achieved with the help of inbuilt rewrite feature. This is the default feature that’s available on a clean installation of Nginx and can form both kinds of Nginx redirect – i.e. permanent and temporary. In its plain form, it takes a minimum of two cases i.e. old URL and new URL.
It is simple and easy to redirect pages to a temporary or permanent location on Nginx web server. In the location /etc/nginx/sites-enabled/default you should paste in the following code, while changing the variables to suit your needs:
Location path_pattern {
     rewrite ^/oldURL$ https://www.domainone.com/newURL redirect;
}
If you want to redirect the page to another link permanently, simple use “permanent” instead of “redirect” in the above command. Meanwhile, the path_patern is typically /index.html.
Nginx Redirecting a Domain
For redirecting one domain to another use the below command in the terminal:
server {
      listen 80;
      hostname devisers.in www.devisers.in;
      rewrite ^ http://www.devisers.com$request_uri? permanent;
}
Here, we use two domains. The one we want to redirect – www.devisers.in, and the new one – www.devisers.com.
Nginx Redirect from HTTP to HTTPS (SSL)
HTTP and HTTPS use different ports – HTTP port 80 and HTTPS port 443. Using HTTPS is much more helpful since it protects you from MITM attacks that can hijack your session. Remember, that for this method to work, you need to have an SSL already set up. So, to protect all the information sent between you and your visitors, it is beneficial to redirect all the requests coming from HTTP to HTTPS. For that, we can add this modification to the same file:
server {
listen 80 default_server;
server_name _;
return 301 https://$host$request_uri;
}
Now all traffic for HTTP default server redirects to HTTPS.
Nginx Redirect Specific Sites
This is essential if you are using various sites or apps and want to redirect only a single site. Follow the steps below:
server {
listen 80;
server_name devisers.in;
     return 301 https://devisers.in$request_uri;
}
Here, we are redirecting the site http://www.devisers.in to https://www.devisers.in
Redirect From www to non-www
There are many times when you want your visitors to access the plain domain of your web page such as devisers.in instead of www.devisers.in. Although there are many options to redirect from www to non-www in Nginx, one of the easy way to do so is as described below:
server {
    server_name www.devisers.in;
    return 301 $scheme://devisers.in$request_uri;
}
Important: This is permanent Redirect or “301 Redirect”.
Restart the Nginx web server to put the changes into effect using the command:
sudo systemctl restart Nginx
If you wish to redirect from non-www to www, simply replace the website URL’s mentioned in the above command. Replace www.devisers.in with devisers.in and vice versa.
1:00 What is HTTPS?

So, as you might guess, HTTPS is HTTP plus S, and S stands for security. In the case of the web, there are two protocols, called SSL and TLS. They’re kind of used interchangeably; I’ll go into that a little bit later. But, is the security layer that sits on top of your communication. If you think of the OSI stratum, it sits below Layer 7 in something called Layer 6, the presentation layer.
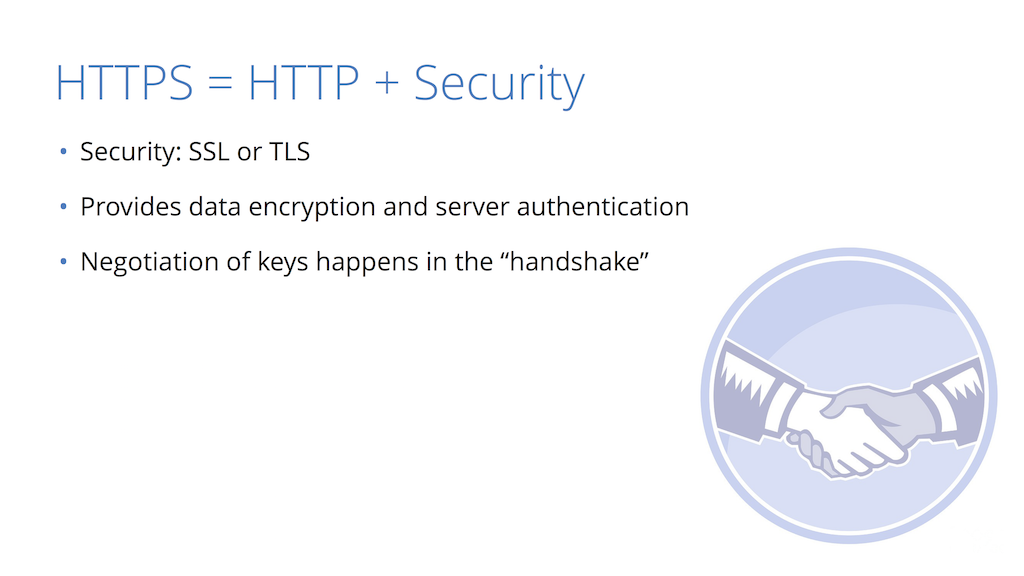
What it provides to you, between a client and the server, is confidentiality of data. So, everything that’s sent from the client to the server and back is fully encrypted so that the only two people that know how to read it are the client and the server. It also provides a form of authentication where the client can know that the server is exactly who it says it is. These are all intertwined in the concept of the handshake.
34:00 Questions?
So that brings us basically to the end of this session. This is how you configure NGINX and OCSP stapling, HSTS, and SSL proxying. So, any questions?
Q1: Do you have a link to your slides?
I will add the slides online and provide a link. You can go to my Twitter handle here, within a few days I’ll put these slides up. Yeah, I realize there’s a bunch of directives on the slides you probably want to copy down and that taking a photo is not the most accurate, most efficient way of doing so. Any other questions?
Q2: Is this how it’s gonna be, or is it gonna be changing over time?
That’s a really good question because, as i mentioned, TLS v1.2 is the latest and greatest. This was in 2008. They’re coming out with a new version, TLS v1.3. This is probably going to be coming out within the next year, so this applies to right now.
HTTPS is a changing landscape, so threats that we didn’t know about two years ago have completely changed the way that you would configure something now than you would have two years ago. So I would expect this to change going forward and for people setting up HTTPS to be aware of the changes in the industry. If there are big attacks, then learn what the new best practices are. So it’s constantly changing, but for now this is the way to go. Okay, thank you very much.
Как установить SSL-сертификат на Nginx
После активации сертификата вам будут доступны необходимые данные для его установки, подробнее в статье Где взять данные для установки SSL-сертификата.
Также вы можете использовать для установки сертификат, купленный в сторонней компании.
Рассмотрим, как выполняется установка и настройка Nginx SSL:
1.
Объедините три сертификата (сам SSL-сертификат, корневой и промежуточный сертификаты) в один файл. Для этого создайте на ПК новый текстовый документ с именем your_domain.crt (your_domain — доменное имя сайта, который вы хотите защитить). Создать его можно при помощи блокнота или другого текстового редактора.
Поочередно скопируйте и вставьте в созданный документ каждый сертификат
После вставки всех сертификатов файл должен иметь вид:
Обратите внимание: один сертификат идёт следом за другим, без пустых строк.
2.
Создайте файл your_domain.key и скопируйте в него содержание приватного ключа сертификата.
3.
Загрузите созданные файлы your_domain.crt и your_domain.key на сервер в директорию /etc/ssl/. Директория может быть иной, например /etc/nginx/ssl/your_domain.com.
4.
Откройте конфигурационный файл Nginx и отредактируйте виртуальный хост вашего сайта, который вы хотите защитить сертификатом
Выполните минимальную для работы настройку, добавив в файл следующие строки:
Где:
your_domain.com — домен сайта,
/etc/ssl/your_domain.crt — путь до созданного файла с тремя сертификатами,
/etc/ssl/your_domain.key — путь до файла с приватным ключом.
Минимальная установка и настройка выполнена. Далее вы можете добавить расширенные настройки конфигурационного файла либо сразу перейти к шагу 12.
5.
Если вы хотите, чтобы сайт работал не только по защищённому соединению (https://), но и по незащищенному (http://), то нужно создать единый HTTP/HTTPS сервер. Для этого в конфигурационном файле Nginx необходимо иметь две секции server{} для каждого типа соединения.
Добавьте в секцию server{}, которую вы создали на шаге 4, следующую строку:
6.
Также вы можете дополнительно оптимизировать работу Nginx HTTPS-сервера. SSL-операции задействуют дополнительные ресурсы сервера. Чтобы снизить количество операций, можно повторно использовать параметры SSL-сессий. Они хранятся в кеше SSL-сессий. Можно задать тип кеша (в примере это shared-кеш, разделяемый между всеми рабочими процессами) и его размер в байтах (в 1 Мб кеша помещается около 4000 сессий) с помощью директивы ssl_session_cache. Также можно увеличить таймаут кеша (время, в течение которого клиент повторно использует параметры сессии) директивой ssl_session_timeout: по умолчанию он равен 5 минутам. Можно настроить время работы одного keepalive-соединения с помощью директивы keepalive_timeout.
Добавьте в конфигурационном файле в секции server{} строки:
7.
Вы можете указать протоколы SSL, которые поддерживает сервер:
8.
Чтобы при использовании протоколов SSLv3 и TLS серверные шифры были более приоритетны, чем клиентские, добавьте следующую строку:
9.
Чтобы уменьшить время загрузки страниц у пользователей сайта, нужно разрешить серверу прикреплять OCSP-ответы для валидации сертификата. При этом необходимо указать путь к файлу корневого сертификата и DNS-сервер.
Создайте файл ca.crt и скопируйте в него содержимое корневого сертификата. Загрузите этот файл на сервер в директорию, где хранятся ранее созданные файлы. В нашем примере это /etc/ssl/.
Затем добавьте в конфигурационном файле в секции server{} строки:
Где:
/etc/ssl/ca.crt — путь до файла с корневым сертификатом,
8.8.8.8 — DNS-сервер.
10.
Сохраните и закройте конфигурационный файл Nginx.
11.
Если вы не остановились на шаге 4, то секция server{} в конфигурационном файле с расширенными настройками будет выглядеть так:
12.
Чтобы изменения вступили в силу, перезагрузите сервер Nginx:
Готово, вы установили SSL-сертификат на Nginx.
